Building a Stock Trading App Using StepZen and AlpacaDB
 Victory Nwani
Developers are often eager to leverage an external service through its API while building a solution. Sadly, a developer might hit a roadblock when they discover that the external service exposes an API that is different from what is already being used, for example, REST in place of GraphQL. What could be the way out of such a blocker? StepZen!
This tutorial will explore StepZen’s feature of transforming multiple REST endpoints into a GraphQL endpoint. To demonstrate working with StepZen, we’ll build a simplified GraphQL endpoint by transforming two REST endpoints within the AlpacaDB Trading API. The GraphQL endpoint will be consumed using Svelte as we build the MVP of a personal stock trading app. As an app for personal use, we will not cover advanced aspects such as user authentication.
The projects in this tutorial are available in this GitHub repo if you would like to dive right into the code!
What You'll Learn
We broke the tutorial down into small sections to make it easier to navigate through. You can follow through in the order that they appear or skip to a section that interests you the most.
- Prerequisites
- Introducing StepZen
- What is the Alpaca Trading API?
- Setting Up An Alpaca Trading Account
- Transforming Alpaca Trading API to GraphQL with StepZen
- Transforming the REST API to GraphQL
- Handling Sensitive Credentials
- Deploying and Testing StepZen Endpoint
- Consuming GraphQL Endpoint
- Creating a Svelte Application
- Creating the GraphQL Client
- Building the Application Interface
- Conclusion
Prerequisites
This tutorial will be a hands-on demonstration involving StepZen and AlpacaDB. To follow along, it is expected that you have;
- Node.js installed on your computer.
- A basic understanding of GraphQL Query and Mutation operations.
- A StepZen account with the StepZen CLI installed on your computer.
Introducing StepZen
StepZen enables developers to build a single GraphQL API endpoint made from multiple data sources such as a REST API, NoSQL, and SQL databases.
What is The Alpaca Trading API?
Alpaca’s Trading API provides developers with the ability to trade stocks from U.S stock exchange markets via a set of REST-based API endpoints.
Setting Up An Alpaca Account
Alpaca provides traders with a web dashboard to manage their tradings and personal account details. Developers, on the other hand, make use of the Trading API to build third-party applications.
Within this tutorial, you will transform the /account and /orders endpoint from the Trading API into a GraphQL endpoint. Through the GraphQL endpoint, you will retrieve the details of your Alpaca account and place an order via a GraphQL mutation operation.
To get started with Alpaca, sign up for a free account through Alpaca’s web dashboard.
Alpaca offers developers experimenting with the Trading API a paper account to use fake funds while their application is being developed. Within this tutorial, you will only use the paper account to avoid incurring charges when placing stock orders via the Trading API.
Each API request made against the Alpaca Trading API endpoints must have the Alpaca API keys present in their request headers for authentication purposes.
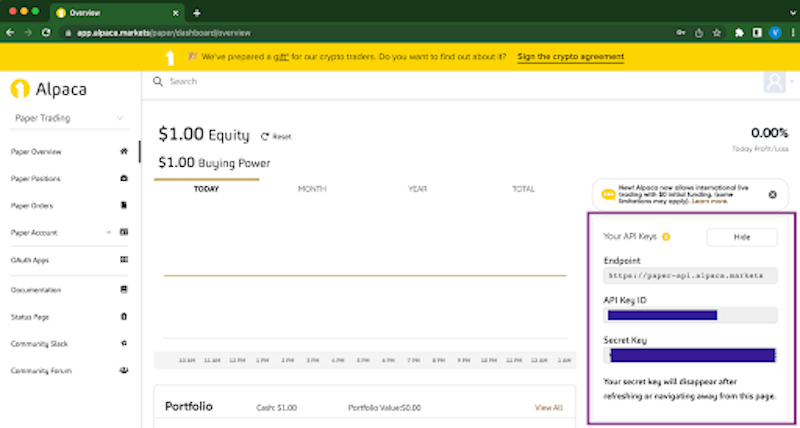
Each Alpaca account has unique API keys placed in the left section of the Alpaca web dashboard.
Click the Generate Key button on the Alpaca dashboard to generate the API keys for your new account.
Transforming Alpaca’s Trading API To GraphQL With StepZen
With your API keys generated and the test funds added to your Alpaca account, you are ready to begin transforming the /account and /orders endpoint within the Alpaca Trading API.
Creating Project Directories
Through your computer’s terminal, execute the two commands below to create a parent directory named alpaca-stepzen and change the directory into it. The alpaca-stepzen directory will contain two smaller projects for a StepZen and Svelte project.
mkdir alpaca-stepzen

cd alpaca-stepzen
Transforming the REST Endpoints To GraphQL
In the previous steps, you created two nested directories to store the StepZen endpoint files. Within this section, you will use the stepzen import feature to generate GraphQL schemas for the /accounts and /orders API endpoints.
Ensure your StepZen CLI is fully authenticated by executing the login command below;
stepzen login
-
Execute the following command to introspect the
/accountendpoint of the Trading API. As this is the first time that the stepzen import command is being used, you will be prompted to provide a name for the endpoint while the configurations are generated.The StepZen CLI will make a test request to the
/accountendpoint and generate the GraphQL schema based on the fields within the request’s response.Replace the API_KEY_ID and SECRET_API_KEY placeholders with the corresponding credentials gotten from your Alpaca dashboard. The two credentials will be passed in the request header of the resulting GraphQL query for Alpaca to authenticate the request.
stepzen import curl https://paper-api.alpaca.markets/v2/account -H "APCA-API-KEY-ID: <API_KEY_ID>" -H "APCA-API-SECRET-KEY: <SECRET_API_KEY>" --prefix Account --query-name AccountQuery

While doing
stepzen import curlyou can use the--nameflag to name the directory that contains the GraphQL schema something else thancurl.
- Replace the Alpaca API credentials and execute the curl command below to place a buy order for 1 quantity of Amazon stock through the
/orderendpoint. The purchase will ensure that your new Alpaca account returns an array with an object when transforming the API endpoint.
curl https://paper-api.alpaca.markets/v2/orders -d '{ "symbol": "AMZN", "qty" : "1", "side" : "buy", "type" : "market", "time_in_force": "day" }' -H "Content-Type: application/json" -H "APCA-API-KEY-ID: <API_KEY_ID>" -H "APCA-API-SECRET-KEY: <SECRET_API_KEY>"
Next, execute the command below to introspect and transform the /orders endpoint into a GraphQL query. The resulting GraphQL query resolver will make it possible to query an array of Stock orders within your Alpaca account.
stepzen import curl https://paper-api.alpaca.markets/v2/orders\?status\=all -H "APCA-API-KEY-ID: <API_KEY_ID>" -H "APCA-API-SECRET-KEY: <SECRET_API_KEY>" --prefix Orders --query-name OrdersQuery

-
Execute the command below to introspect the
/ordersendpoint and generate a GraphQL mutation. Through the resulting GraphQL mutation, you will be able to place a stock order in Alpaca using GraphQL.StepZen will submit the JSON formatted data specified in the
-dflag through a POST request to the/ordersendpoint.
stepzen import curl https://paper-api.alpaca.markets/v2/orders -d '{ "symbol": "AMZN", "qty" : "1", "side" : "buy", "type" : "market", "time_in_force": "day" }' -H "Content-Type: application/json" -H "APCA-API-KEY-ID: <API_KEY_ID>" -H "APCA-API-SECRET-KEY: <SECRET_API_KEY>" --prefix CreateOrder --query-name CreateOrder

Using your code editor, open the index.graphql file with the curl-02 directory and manually edit the Query type to Mutation as shown below:
type Mutation {
    #StepZen generated code
}
Handling Sensitive Credentials In StepZen
While using the stepzen import command through the three steps from the previous section, you provided your Alpaca API credentials to the StepZen import command. Your Alpaca account will become compromised if your API credentials get exposed to the public.
Did you wonder where your Alpaca API credentials were being stored while executing each of those commands?
StepZen provides developers with the ability to protect each API key used when connecting to an API by separating them from the StepZen project. StepZen recommends that you create a config.yaml file to store the API keys, then reference them in the .graphql files.
For an improved developer experience, the API keys you provided when you used the StepZen import command were automatically stored in a config.yaml file.
Open the config.yaml files to view your API credentials. You can also change the API key values if you regenerate new API Keys from Alpaca.
configurationset:
 - configuration:
     name: curl_import_config
     apca_api_key_id_0769a98b7c: <API_KEY_ID>
     apca_api_secret_key_3a75daf459: <API_SECRET_KEY>
Deploying and Testing StepZen Endpoint
At this point, you have used the stepzen import command to create a StepZen endpoint with schemas for the /account and /orders endpoint. Let’s proceed to upload the schemas generated to StepZen and execute a Query and Mutation operation to test the api/alpaca-graphql endpoint.
Open a separate terminal and execute the command below to upload the GraphQL schema for the api/alpaca-graphql endpoint to StepZen.
stepzen start
You can now explore the StepZen GraphQL API from the Explorer in the dashboard. Or, use the GraphiQL IDE to execute GraphQL queries and mutations. To use the GraphiQL IDE, run the command stepzen start --dashboard=local to start up GraphiQL locally.
Using your web browser, open the local GraphiQL for your StepZen endpoint on http://localhost:5001/api/alpaca-graphql.
GraphiQL is a useful tool for developers using GraphQL as it provides introspection features that allow developers to explore what Query and Mutation operations exist within a GraphQL API, alongside the fields that each operation requires or returns in a response.

Through the three steps below, you execute a GraphQL Query and Mutation through the opened GraphiQL playground.
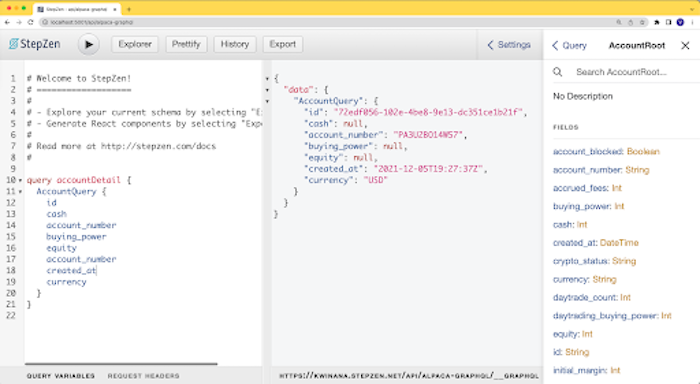
Add the code below into the GraphiQL playground to create a Query that will execute the AccountQuery resolver generated from Alpaca’s /account endpoint.
query accountDetail {
        AccountQuery {
            id
            cash
            account_number
            buying_power
            equity
            account_number
            created_at
            currency
        }
    }
Click the Play icon to execute the accountDetail query added above.
As shown in the image below, an AccountQuery object containing the return fields taken from the AccountRoot type will be returned.
- Add the code below into the GraphiQL playground to create an additional query for fetching all orders placed from your Alpaca account.
query getOrders {
  OrdersQuery(status: "all") {
    id
    client_order_id
    asset_id
    asset_class
    created_at
    qty
    type
    updated_at
    status
    order_type
  }
}
The getOrders query will return an array of all orders placed from your Alpaca account. You can change the status parameter to either all, open, or closed to filter the orders returned.

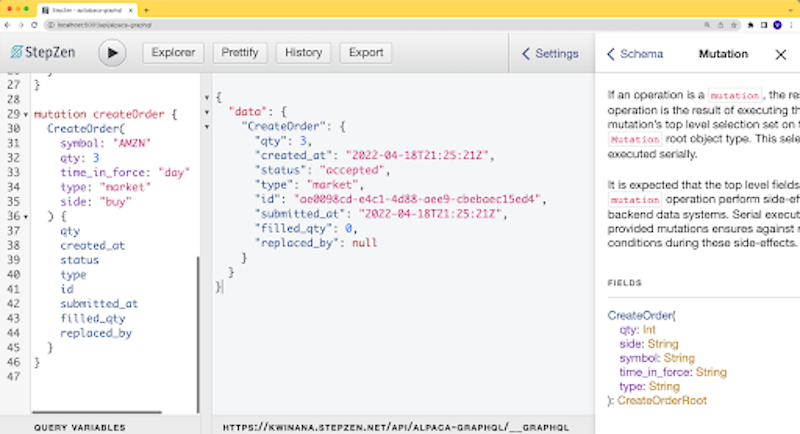
- Add the code below into the GraphiQL playground to create a mutation that will place a Stock order.
mutation createOrder {
  CreateOrder(
    symbol: "AMZN"
    qty: 3
    time_in_force: "day"
    type: "market"
    side: "buy"
  ) {
    qty
    created_at
    status
    type
    id
    submitted_at
    filled_qty
    replaced_by
  }
}
Execute the createOrder mutation by clicking the Play icon.
As shown below, the createOrder mutation in the code will place a buy order for 3 Amazon (AMZN) stocks and return an object containing the return fields specified in the mutation.
Consuming GraphQL Endpoint From A Svelte Application
At this point, you now have a GraphQL endpoint that returns account detail and orders, and it also allows you to place an order through an Alpaca account. The stage is now set for building the frontend component of the stock trading application!
Within this section, you will move further to consume the StepZen-generated GraphQL endpoint from a Svelte application.
Creating A Svelte Application
Svelte is one of the frontend libraries within the JavaScript ecosystem for building highly reactive and lightweight web applications. Built on Svelte, SvelteKit is a frontend framework that makes it easier to develop Svelte applications by providing added features to Svelte such as out-of-the-box routing.
Using the existing terminal, execute the two commands below to move out of the stepzen-wrapper directory as you want to avoid creating the Svelte application within the StepZen project directory.
Next, execute the npm command to launch the interactive SvelteKit installer for creating a Svelte application named stepzen-stock-graphql.
cd ..

npm init svelte stepzen-stock-graphql

With the Svelte application created, you can proceed to install packages from NPM that are needed to consume a GraphQL endpoint.
Execute the command below to install @urql/svelte and [graphql(https://www.npmjs.com/package/graphql)] packages. The @urql/svelte package will be used to create a GraphQL client that uses the api/alpaca-graphql endpoint from StepZen.
npm install @urql/svelte graphql
Creating the GraphQL Client
The GraphQL client about to be created will be used to execute GraphQL operations against your StepZen endpoint. Each of the GraphQL operations executed will need to have your StepZen API key in its request header for authentication.
Let’s proceed to retrieve your StepZen API key and securely store it in the stepzen-stock-graphql project!
The StepZen web dashboard and CLI provide you with the ability to view your StepZen API key.
Execute the whoami command below to retrieve only your API key through the StepZen CLI. Take note of the API key returned as you will use it in the next step.
stepzen whoami --apikey
Next, create a .env file at the root directory of the stepzen-stock-graphql project to store the API key and URL for the api/alpaca-graphql endpoint.
Store the API key and endpoint URL using the fields in the code block below. The two variables are prefixed with the VITE_ text to ensure that they are available to the client for creating the GraphQL client.
Note: Make sure to replace the STEPZEN_API_KEY and GRAPHQL-ENDPOINT placeholders with their corresponding values.
VITE_STEPZEN_API_KEY=<STEPZEN_API_KEY>
VITE_STEPZEN_API_URL=<GRAPHQL-ENDPOINT>
Within the src directory, create a config.js file to store the code that will create a GraphQL client using the @urql/svelte package.
Add the JavaScript code below into the config.js file;
The code block above retrieves the two environment variables using the Vite Env Variables syntax.
import { createClient } from '@urql/svelte'

export const GraphqlClient = createClient({
   url: import.meta.env.VITE_STEPZEN_API_URL,
   fetchOptions: () => (
       {
        headers: { 'Authorization': `Apikey ${import.meta.env.VITE_STEPZEN_API_KEY}` }
       }
   )
});
The GraphQL client created in the code block above will be imported in other parts of the Svelte application.
Create a graphqlOps.js file within the src directory. The graphqlOps.js file will contain the Query and Mutation template literals that will be used to execute GraphQL operations against the api/alpaca-graphql endpoint.
Add the three exported template literals within this remote code file into the graphqlOps.js file you created.
The pseudo-code below shows a glimpse of the exported template literals. View the entire code within the graphqlOps.js file on GitHub
export const GET_ACCOUNT_DETAILS = `
   query accountDetail {
       AccountQuery {
           # Alpaca account object
       }
   }
`

export const GET_ACCOUNT_ORDERS = `
query getOrders($orderStatus: String) {
   OrdersQuery(status: $orderStatus) {
       # Alpaca order object
   }
}
`

export const CREATE_STOCK_ORDER = `
   mutation createOrder($symbol: String, $qty: Int, $time_in_force: String, $type: String, $side: String ) {
       CreateOrder(
           # mutation parameter
       ) {
           # return ID
       }
   }
`
As you proceed to build out the application’s interface in the next section, you will import each of the template literals above.
Building The Application Interface
As explained earlier, the function of the default page will be to display all stock orders placed from your Alpaca account. At the click of a button, a modal should be launched to collect the details of a buy order. You will also use TailwindCSS to style the entire application.
To encourage modularity, you build the interface across the existing Index component and a new PurchaseStockModal component which will contain the input fields for collecting the details of a stock order.
Let’s get started by rebuilding the index.svelte file, one step at a time.
Replace the boilerplate code in the index.svelte file within the pages directory with the content of this svelte file.
The code block below shows a glimpse of the code in the index.svelte file. View the entire code within the index.svelte file on GitHub.
<script>
   function handleModalVisibility(modalState) {
       # handle modal visibility content
   }
</script>

<svelte:head>
   # TailwindCSS CDN link and page name
</svelte:head>

<body>
   {#if $accountDetail.fetching}
       <!-- VIEW DISPLAYED WHILE FETCHING DATA -->
   {:else}
       <div>
           {#if shouldShowPurchaseModal}
                <!-- PURCHASE MODAL COMPONENT -->
           {/if}

           <div style="background-color: #fff5e8;">
                <!-- PAGE BANNER -->
            </div>

               {#if $accountOrders.fetching}
                    <!-- DISPLAY LOADER FOR accountOrders QUERY -->
               {:else}
                   <div class="mx-8 mb-6">
                     <ul>
                       {#each $accountOrders.data.OrdersQuery as order}
                           <li class="flex justify-center items-center">
                                <!-- DISPLAY EACH ORDER OBJECT IN A CARD -->
                           </li>
                       {/each}
                   </ul>
               {/if}
           </div>
       </div>
   {/if}
</body>
The inline script within the svelte file contains the local state for the Index component. The GraphQL client exported from the config.js file is imported, and the operationStore is used to execute two queries for fetching the Alpaca account details and all orders placed within the account.
At the svelte:head tag, TailwindCSS is being injected into the Svelte application through its CDN link.
While the GraphQL request is in flight, the new Index component uses a conditional statement to render the loading state shown below;
After the GraphQL requests are completed, the array of orders returned from the getOrders query is iterated over using Svelte’s each logic block in an unordered list (ul). Each stock order object is then displayed in a list item (li) having a card.
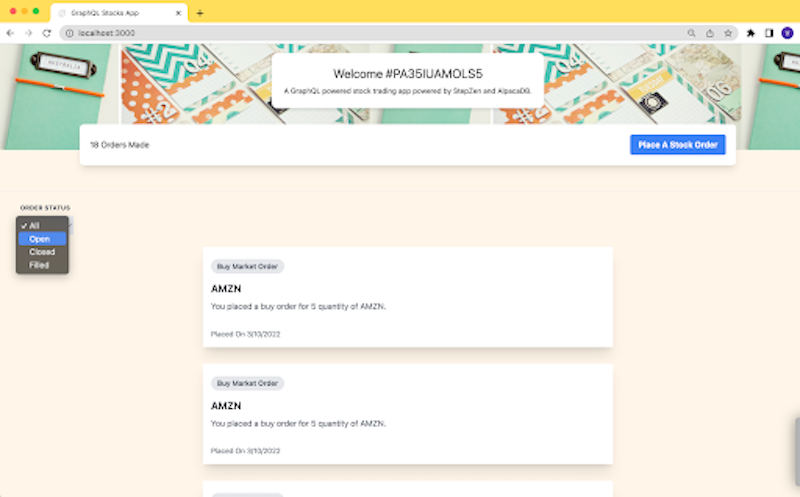
The default page at this point displays data, however, the Purchase modal has not been implemented.
Create a PurchaseModal.svelte file in the pages directory. The PurchaseModal.svelte file will contain a child component that displays a modal on the default page when a button is clicked.
Add the code content of this code snippet into the PurchaseModal.svelte file to implement the modal for placing a stock order.
The code snippet shows an abbreviated content of the PurchaseModal.svelte. View the entire code within the PurchaseModal.svelte file on GitHub.
<script>

   async function handleOrderSubmission() {
      // submission function.
   }
</script>

<div
   class="fixed z-10 inset-0 overflow-y-auto"
   aria-labelledby="modal-title"
   role="dialog"
   aria-modal="true"
>
       <!-- MODAL CONTENT -->
</div>
Of interest in the code snippet will be the asynchronous handleOrderSubmission function that is executed when you click a button to save the details of the stock order. The mutation method takes the exported createStockOrder mutation literal as a parameter and returns an executable function that is used in the handleOrderSubmission function.
After a stock order has been placed, the handleClose prop function is executed to close the modal while the refetchOrders function prop is executed to re-execute the getOrders query in the Index parent component.
Note: To avoid overcomplicating the tutorial, the stock purchase was restricted to a buy type on market orders only by hardcoding values of the time_in_force, type, and side input parameters.
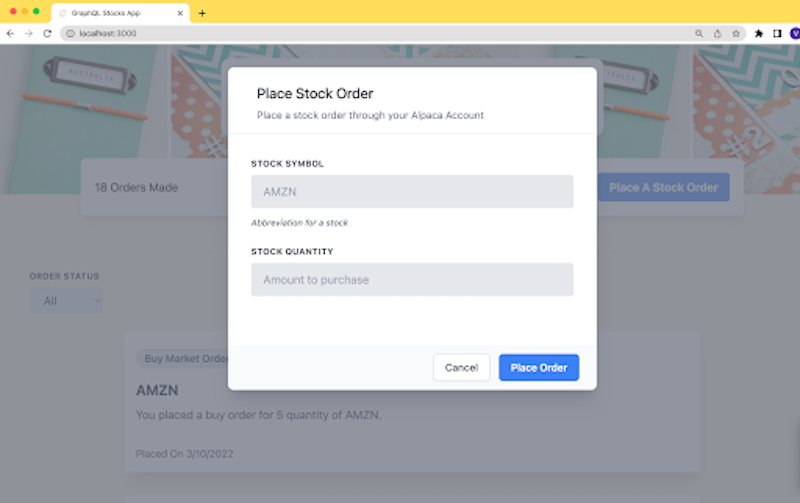
As shown below, when the modal is launched you will see two input fields for entering the name and quantity of a stock order. You can either place the order or dismiss the modal using the two buttons at the bottom of the modal.
That’s it!
An MVP of your simplified personal stock trading application powered by Alpaca and StepZen is ready for use.
Conclusion
Congratulations on getting this far!
In this tutorial, you used a GraphQL API to build a stock trading application. To do so, you used StepZen to transform the /accounts and /orders endpoint from Alpaca’s REST-based API into GraphQL. You then built a Svelte application styled using TailwindCSS to query all orders within an account, and also place a new order.
Editor's Note: A huge thank you to Victory for building with StepZen and for sharing his experience in this instructive tutorial. Learn more about StepZen in our docs. Try it out, and join the Discord to share what you are building and ask any questions.