Compose Data from Fauna and GitHub using GraphQL and StepZen
 Roy Derks
You can find the complete code example for this blog on the StepZen GitHub page.
Data composition is getting more and more important for modern APIs. Companies no longer store data in just one database; more often, data comes from multiple sources. For example, a database or third-party APIs with all sorts of specifications. In GraphQL, the composition of data in APIs is also called federation. This post will teach you how to compose data from Fauna and GitHub using GraphQL and StepZen.
To show how to compose (or federate) data, we'll be combining data from Fauna and GitHub. Fauna is a distributed document-relational database delivered as a global API. Fauna can be queried using Fauna Query Language (FQL), and also provides a native GraphQL API. GitHub is a popular code hosting platform for version control and collaboration, and it also provides a GraphQL API. The API we'll build in this post will take data from a GitHub repository and enrich it with data stored in Fauna using StepZen. StepZen is a GraphQL-as-a-Service platform that allows you to compose data from multiple sources into one API declaratively. The diagram below shows how the data will be composed.
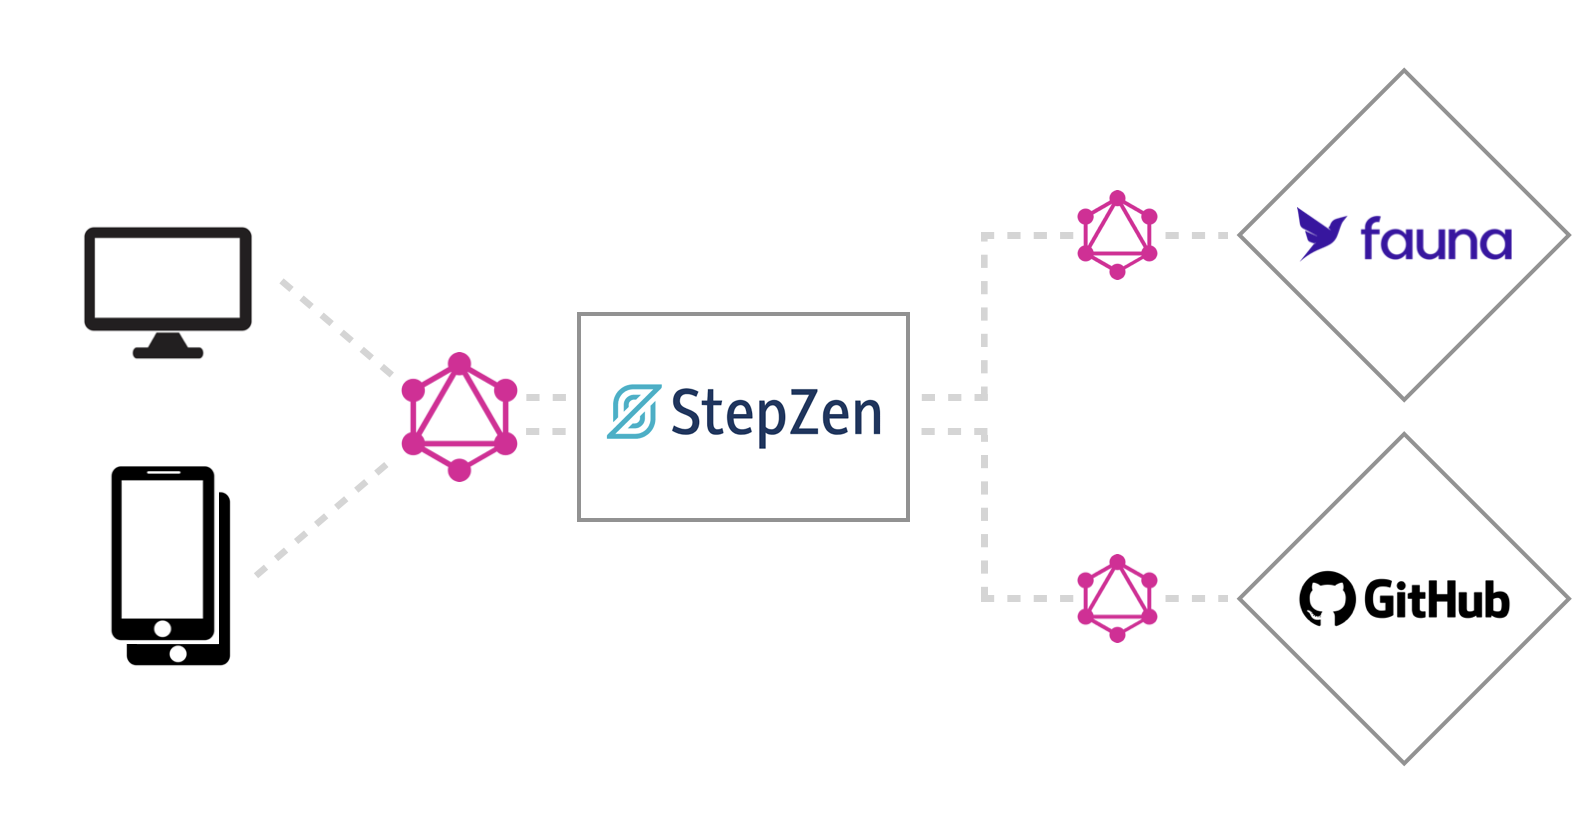
You can query the GraphQL API created with StepZen from any application you connect. For example, you can use the API in a web application to display a list of repositories with their stars and forks. You can also use the API in a mobile application to show the same data.
First, we'll explore the GitHub GraphQL API and see how we can query it. Then we'll set up and seed a Fauna database with data. Finally, StepZen will be used to combine the data from Fauna and GitHub and return it as a single GraphQL response.
Explore the GitHub GraphQL API
In this post, we'll be building a GraphQL API that composes data from Fauna and GitHub. To get started, we'll explore the GitHub GraphQL API. The GitHub GraphQL API is a public API that you can use to query data about repositories, users, organizations, and more. The API is documented on GitHub and can be queried using GraphiQL.
To get started, we'll query the API to get the names and descriptions of users' repositories. The query below will return the name and description of the repositories of the user octocat. You can replace the login argument with your own GitHub username.
{
  user(login: "octocat") {
    repositories(first: 5) {
      edges {
        node {
          id
          name
          description
        }
      }
    }
  }
}
This query will return the data as seen in the screenshot below.
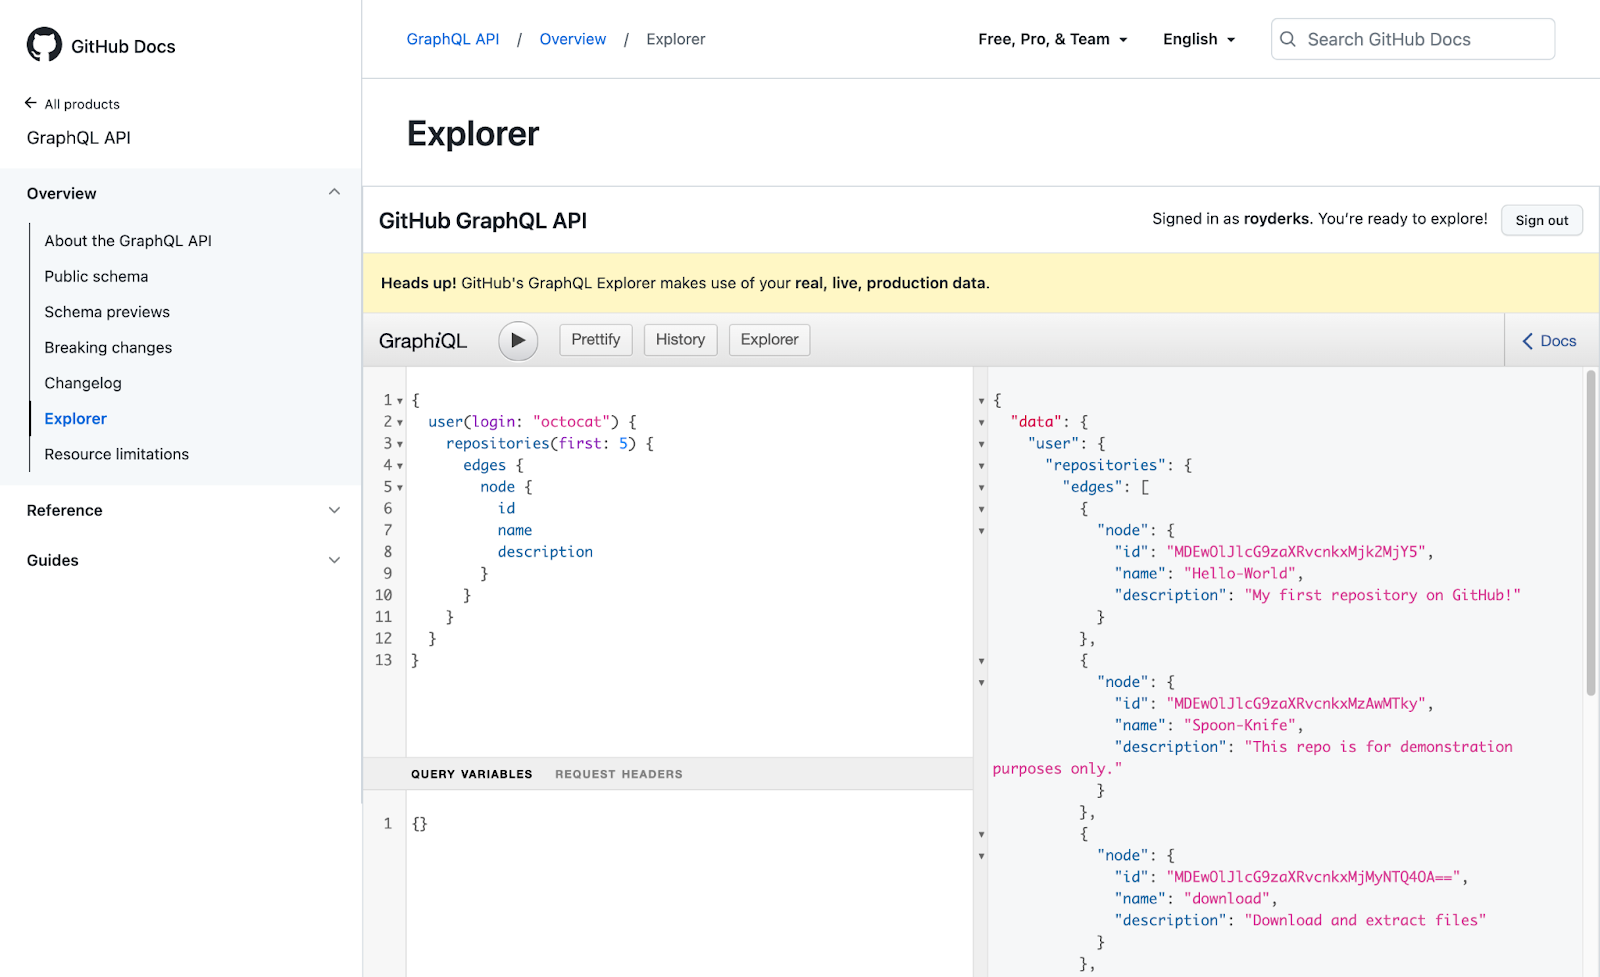
When you're not using the Github GraphiQL explorer to query the GraphQL API, you should create a personal access token and use it in the Authorization header of your GraphQL requests. You can create a personal access token in your Github settings.
From the Github GraphiQL explorer, you can find all the fields that you can query for the GitHub repositories. This aside, we'll set up a Fauna database next that will contain our data about the repositories. We will use the data from Fauna to enrich the data from GitHub.
Set up Fauna
Create a Fauna account
To get started with Fauna, you need to sign up here, for example, by signing up using your GitHub account. After you've signed up, you'll be redirected to the Fauna dashboard. From the dashboard, you can create a database by clicking on the + Create Database button
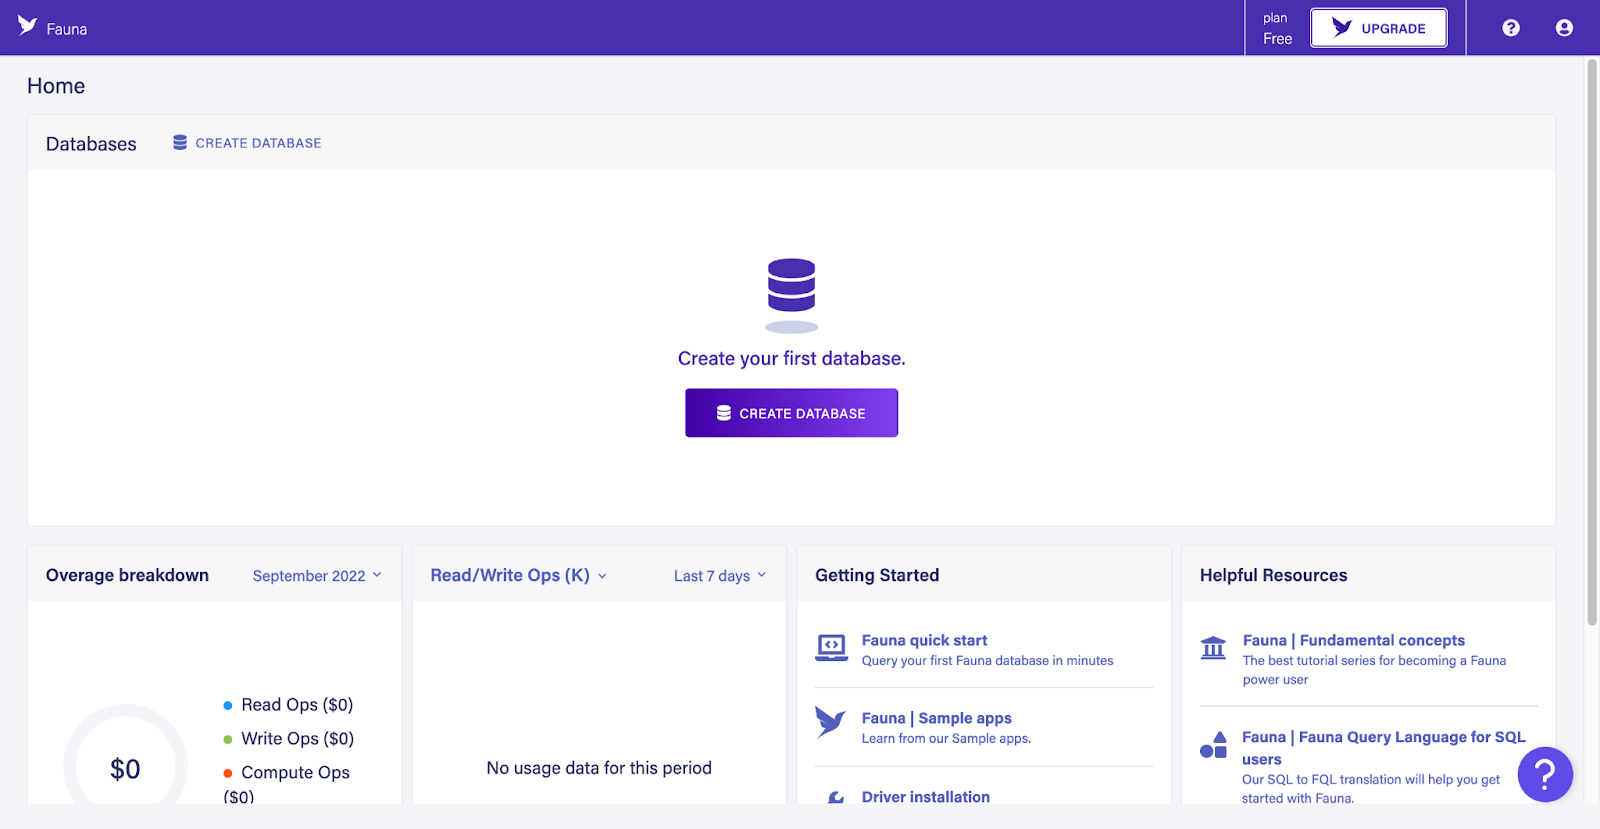
Give the database a name, for example, stepzen-demo and select a region where Fauna should host the database. GraphQL APIs created on StepZen free plan are hosted in the US, so we will choose that region.
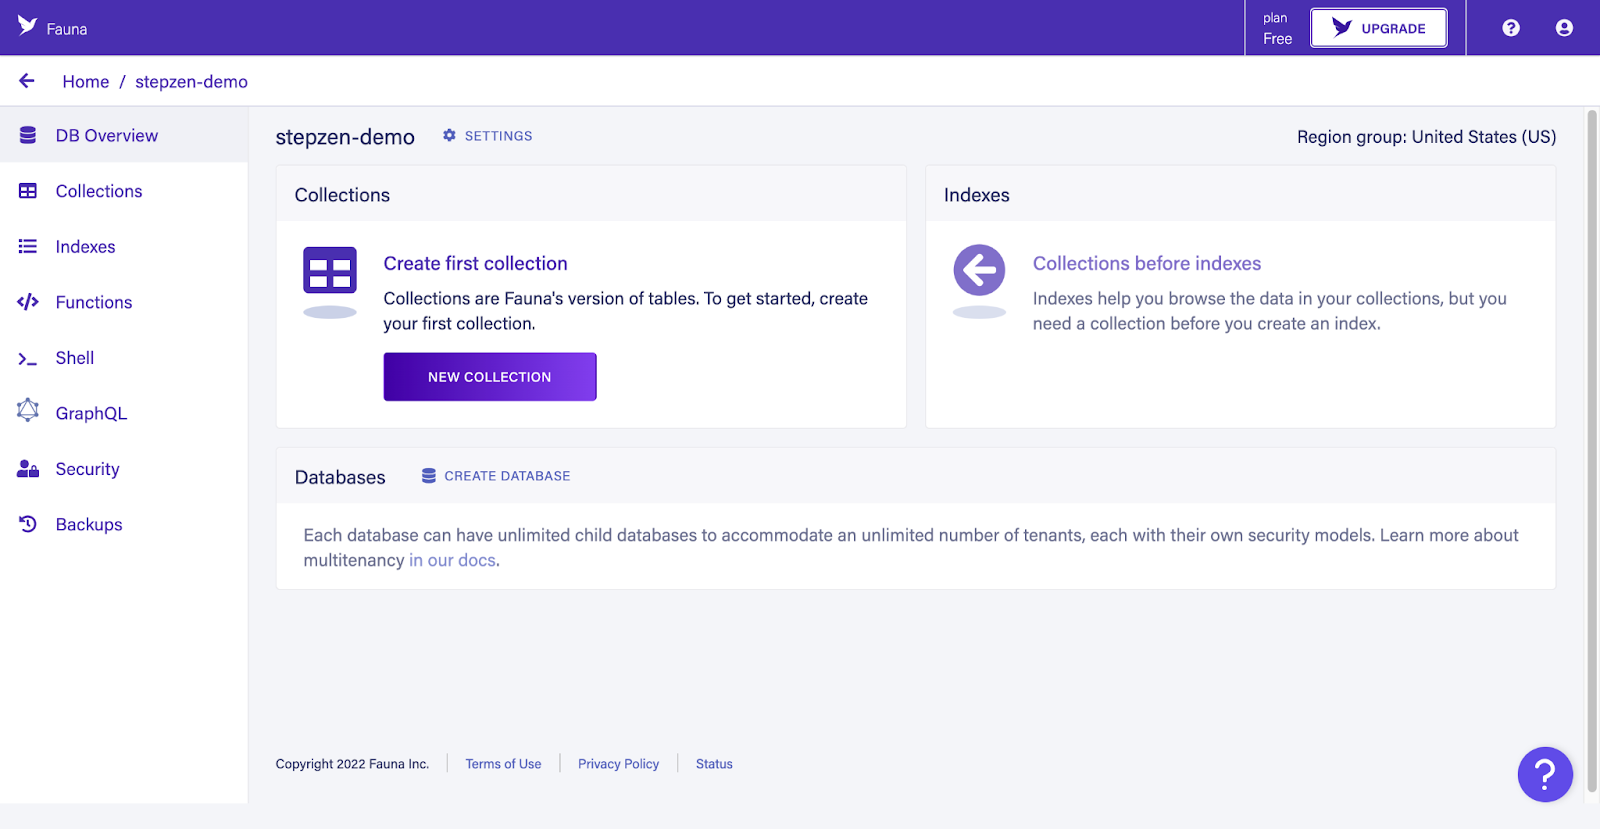
The Fauna dashboard will show the database you created. From this page, you can also add data to the database. Fauna is a document-based database, so data is stored as collections in the database instead of tables. In the next step, we will create a collection and add some data. For this, you can use the dashboard or the tool fauna-shell.
Create a collection
To create the API, we will need some data to work with, so we first need to create a collection before storing data. A collection is a container for documents, the actual data stored in Fauna.There are two ways to seed your Fauna database with the initial data, via the dashboard or your terminal using fauna-shell.
Let's use the dashboard to create our first collection. From the dashboard, we can upload a GraphQL schema to create the collection and the documents. The schema is a GraphQL schema but not a GraphQL API, and uses it to create the collection and documents that will be stored in Fauna.
To create a collection, click on the GraphQL tab in the left menu. You can upload a GraphQL schema on this page by clicking on the Import Schema button. The file you can upload here should be in .gql or .graphql format, so you can create a new file in your editor and copy the following schema.
type Highlight {
  repository: Repository! @relation
}

type Repository {
  owner: String!
  name: String!
  coverImage: String
  shortDescription: String
}

type Query {
  highlights: [Highlight]!
  repositories: [Repository]!
}
In this post, we'll build a GraphQL API that returns a list of highlighted GitHub repositories enriched with data from Fauna, such as a cover image and a short description. The schema above defines the data structure of the documents that will be stored in Fauna. The Highlight collection will contain documents with a field repository related to the Repository collection. The Repository type defines the data structure of a repository (e.g. the enriched data) and has a link to the data from GitHub via the owner and name fields. Let's import some of the data from GitHub to Fauna.
Add data to the collections
After you've uploaded the schema, you can add data to the collections. To add data to the Repository collection, we will use the GraphQL API that Fauna provides. To do this, click on the GraphQL tab in the left menu and click on the Playground button. Clicking this button will open the GraphQL playground, similar to the one from Github, where you can write queries to interact with the Fauna GraphQL API.
Looking at the Docs tab in the playground, you can see the schema you uploaded earlier. You can also see the queries and mutations that you can use to interact with the Fauna GraphQL API. Fauna has automatically generated queries and mutations based on your imported schema, for example, to get a single repository by its id or to create/update a repository. Also, the queries to get all repositories and highlights are extended with pagination fields.
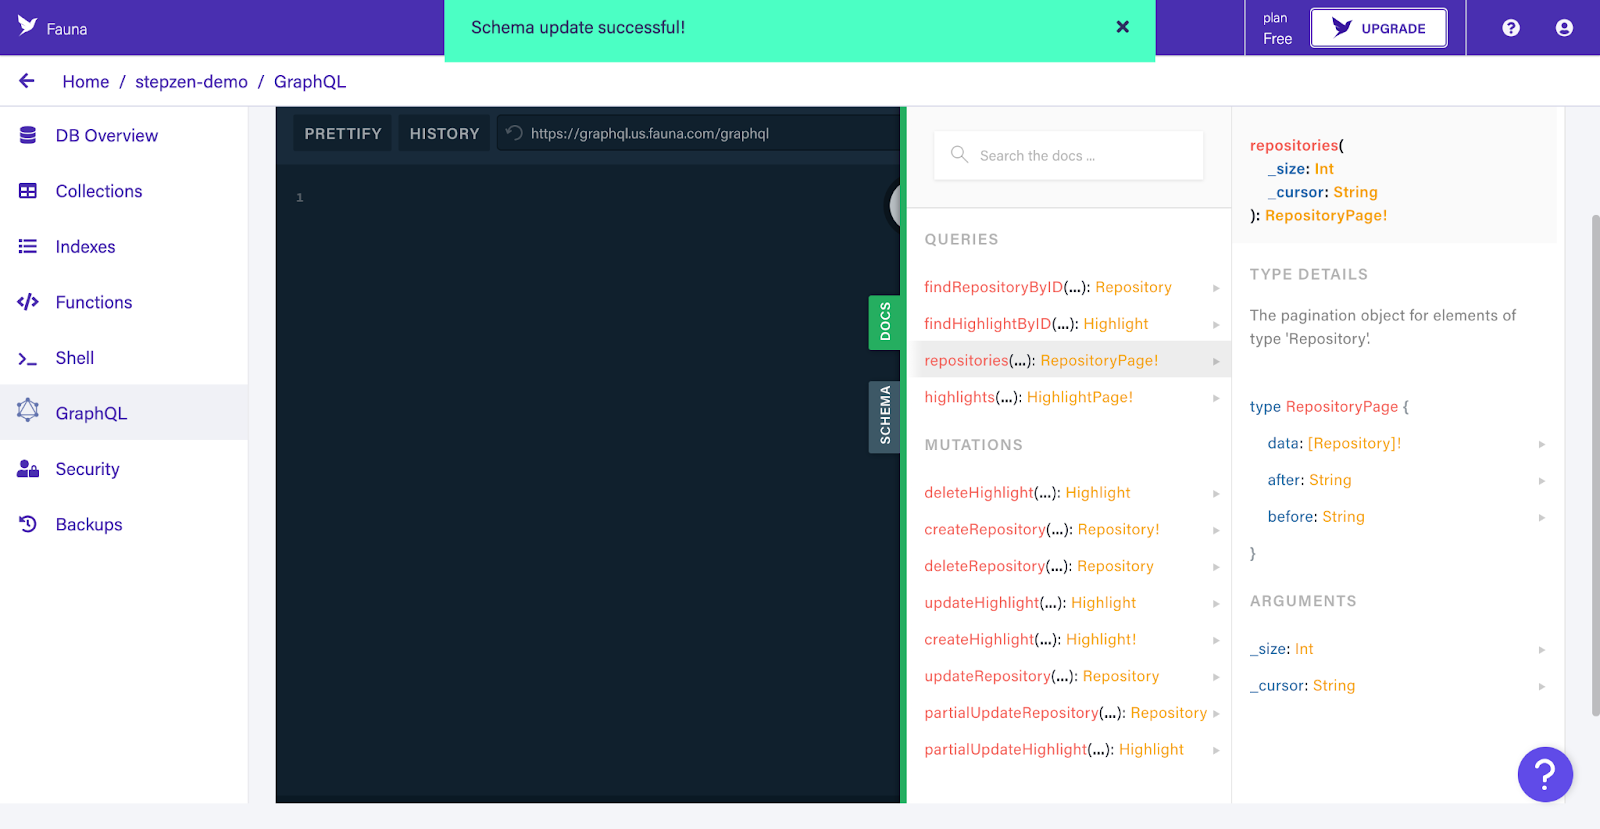
We'll be using the generated mutation createRepository mutation to add the data from GitHub to Fauna. The mutation below will create a new document in the Repository collection. Remember the query we ran earlier to get the id, name, and description of the repositories of the user octocat? We'll use this data to store the owner and name fields from GitHub in Fauna. The coverImage and shortDescription fields will remain empty.
mutation {
  createRepository(data: {
    owner: "octocat",
    name: "hello-world"
  }) {
    _id
  }
}
After you've run the mutation, you can see the new document in the Repository collection. You can also see the _id field that Fauna has generated for the document. This _id field is used to identify the document in Fauna, so we'll be using this _id field to link the document in the Highlight collection to the document in the Repository collection:
mutation {
  createHighlight(
    data: { repository: { connect: "343960570233356362" } }
  ) {
    repository {
      _id
    }
  }
}
The repository field in the Highlight collection relates to the Repository collection, meaning you could query this relationship using the Fauna GraphQL API.
As we now have two GraphQL APIs, let's continue to the final part of this post and combine them into one GraphQL API using StepZen.
Use StepZen to GraphQL APIs
Combining the two GraphQL APIs into one GraphQL API is done using StepZen. StepZen is a GraphQL API service that allows you to create GraphQL APIs for your data sources (SQL, NoSQL, REST, and GraphQL) or to combine multiple GraphQL APIs into one GraphQL API. StepZen can be used via a CLI and has a generous free plan.
The act of combining or composing GraphQL APIs is also called federation. StepZen can also be used as a GraphQL federation service, which means combining multiple GraphQL APIs into one GraphQL API. The GraphQL APIs that are combined into one GraphQL API is called subgraphs, and for this section, we'll be using the GitHub GraphQL API and Fauna as a subgraph.
Set up StepZen
To use StepZen, you should download and install the CLI from npm, by running the following command:
npm install -g stepzen
After installing, you can choose to run StepZen locally using Docker or in the cloud by signing up for a free account at stepzen.com. For this example, we'll be using the cloud version, for which you can sign up for a free account using your GitHub account.
Import the GitHub GraphQL API
Inside a new project, we'll be using the CLI first to import the Github GraphQL using the following command:
stepzen import graphql
And answer the prompts with the values below, where the prefix github is added to all types and operations. Using prefixes will prevent naming conflicts once we import Fauna as a subgraph.
? What is the GraphQL endpoint URL?
https://api.github.com/graphql

? Prefix to add to all generated type names (leave blank for none)
github_

? Should type prefix be added to query and mutation fields as well?
Yes

? Add an HTTP header, e.g. Header-Name: header value (leave blank for none)
Authorization: bearer ghp_************
To query the GraphQL API from Github, you need to pass along a personal access token and pass it as an Authorization header to the CLI import command. You can create a personal access token in your GitHub settings.
The StepZen CLI will generate a schema containing the types and queries that are available in the GitHub GraphQL API. You can see the generated types and queries in the file graphql/index.graphql in the project directory. Also, the CLI will generate a config.yaml file that contains the GitHub personal access token.
You can start the StepZen server by running the following command:
stepzen start
The start command will deploy the GraphQL schemas to the StepZen cloud and start the StepZen server. The first time you run this command, you need to provide an endpoint name, api/with-fauna. You can now open the GrapihQL playground from the link in the terminal to query the GitHub GraphQL API through StepZen.
The default way to test your GraphQL endpoint is now from the StepZen dashboard explorer. You can get a local GraphiQL IDE by running
stepzen startwith the--dashboard=localflag.
Import the Fauna GraphQL API
Second, we also need to import the GraphQL API for the Fauna database into StepZen. To do this, we'll be using the stepzen import graphql command again, but this time we'll use the connection details to the Fauna GraphQL API.
You can find the connection details in the Fauna dashboard under the "GraphQL" tab. You can copy the endpoint from the "Endpoint" field at the top and the authorization token under "HTTP headers".
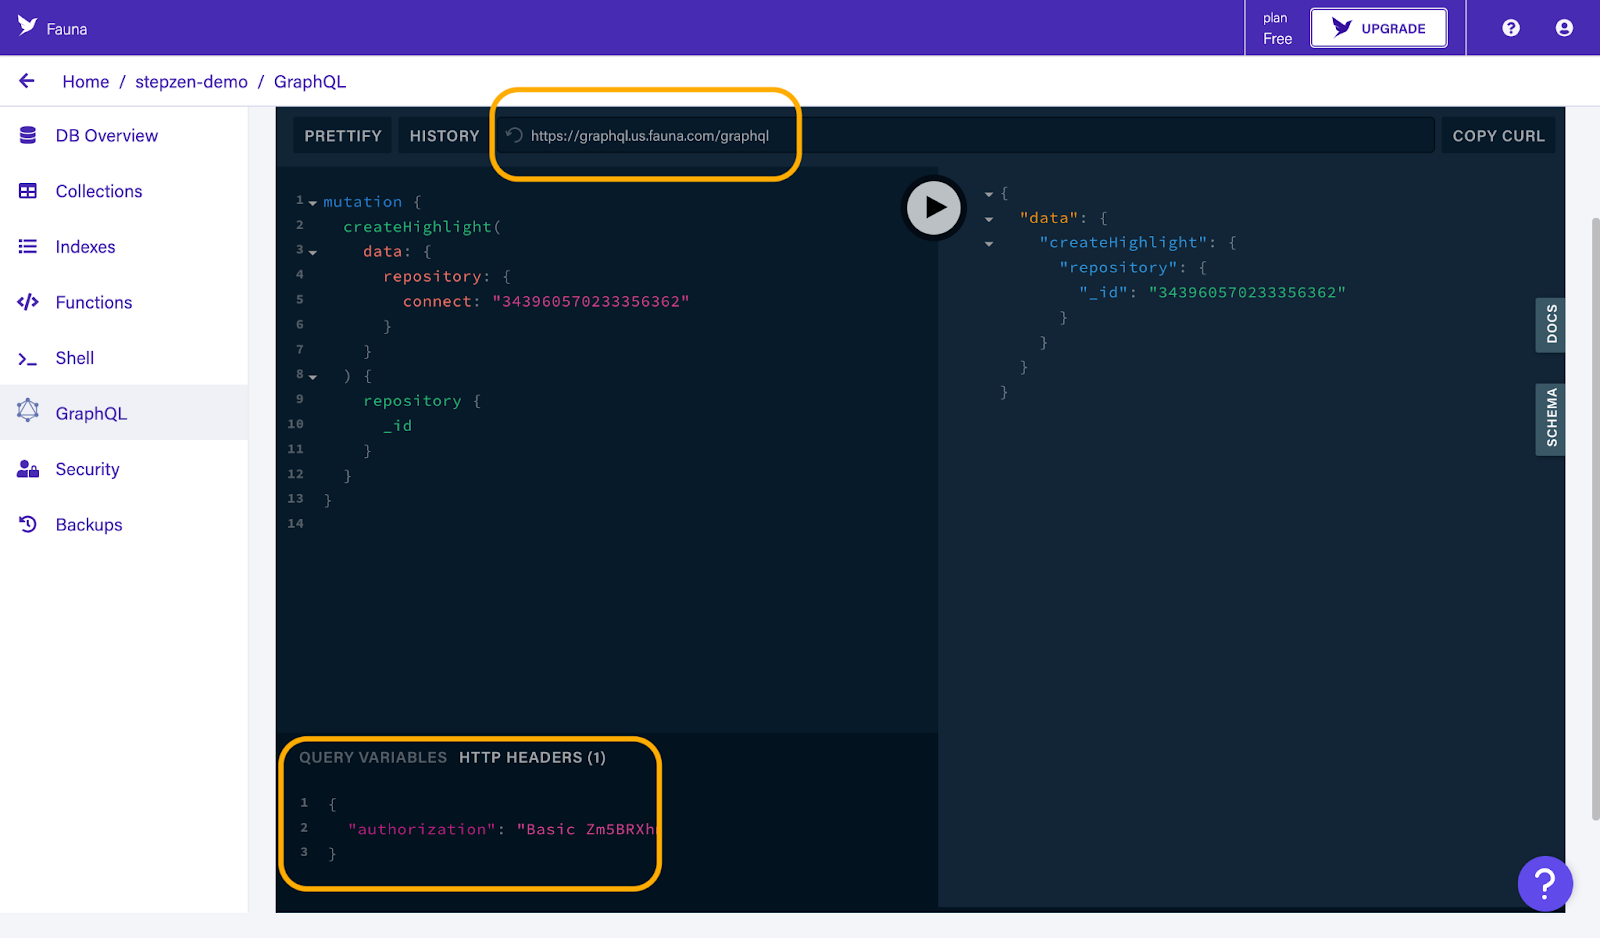
And enter them in the prompts of the StepZen CLI:
? What is the GraphQL endpoint URL?
https://graphql.us.fauna.com/graphql

? Prefix to add to all generated type names (leave blank for none)
fauna_

? Should type prefix be added to query and mutation fields as well?
Yes

? Add an HTTP header, e.g. Header-Name: header value (leave blank for none)
Authorization: Basic ****************
This time we used the prefix fauna_ to prevent any naming conflicts in the types and operations, for example, the Repository type from the GitHub GraphQL API and the Repository type from the Fauna GraphQL API.
After importing the Fauna GraphQL API, you can see the generated types and queries in the file graphql-01/index.graphql in the project directory. The token for the Fauna GraphQL API is also stored in the config.yaml file.
Also, we can query the highlights from the Fauna GraphQL API from StepZen, as you can see in the screenshot below:
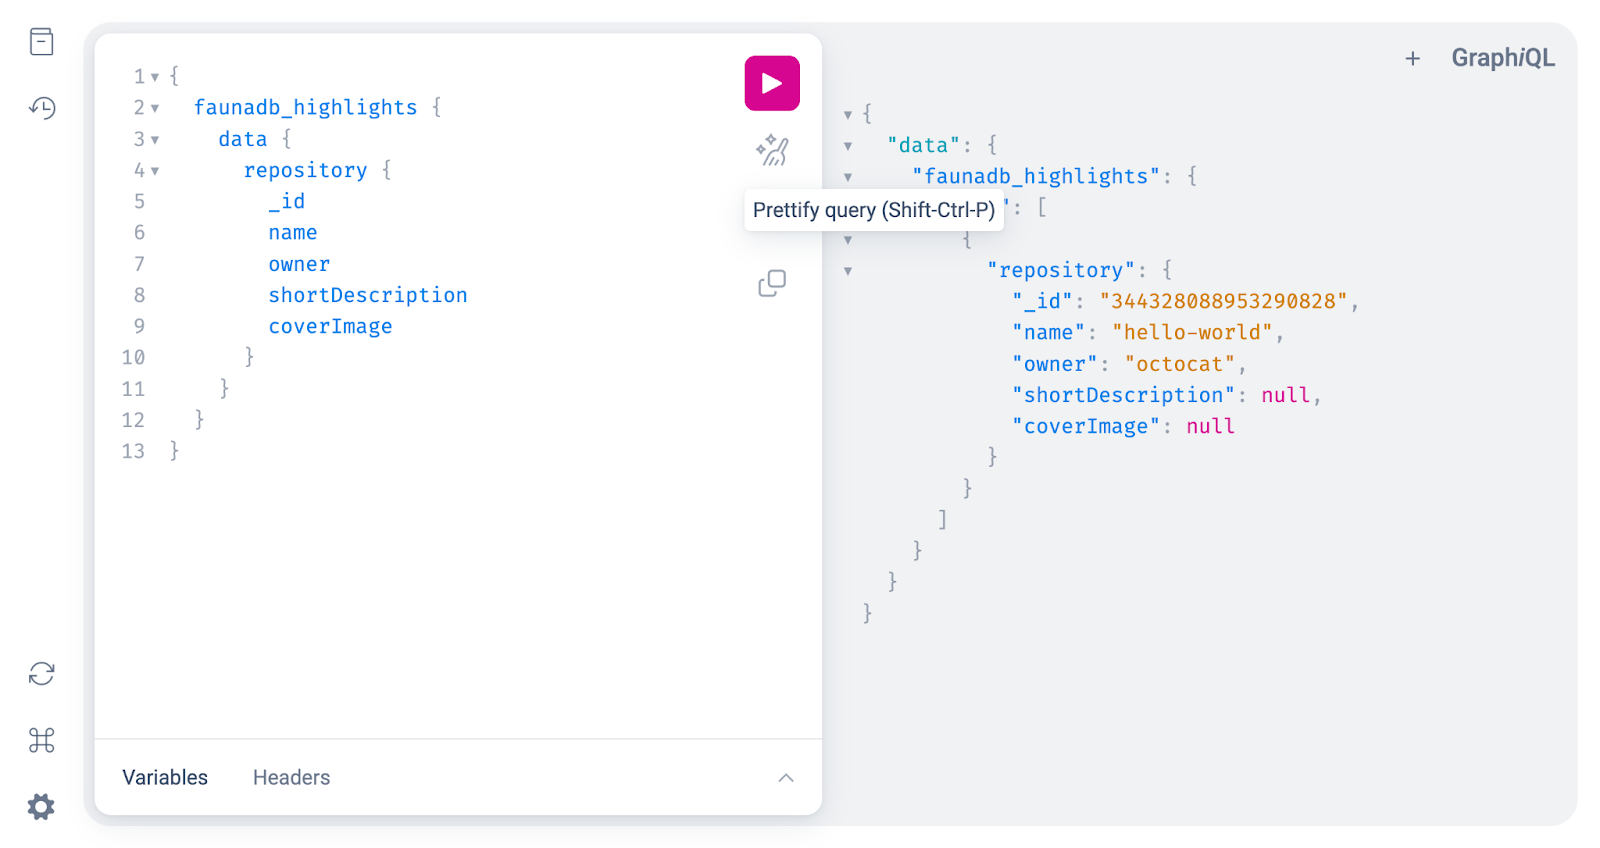
The final step is to compose the data from the two GraphQL APIs by combining them into one GraphQL API. This is done by adding a extends.graphql file in the project directory, which will contain the types and queries that will be used to query the data from the two GraphQL APIs.
Compose data using StepZen
We're now able to query both the GitHub GraphQL API and the Fauna GraphQL API individually using StepZen. To compose the data in one single GraphQL API, we'll create a new file called extends.graphql file. This file will contain the types and queries that we will use to query the data from the two GraphQL APIs.
Inside this new file, you should add the following code block:
extend type fauna_Repository {
  githubDetails: github_Repository
    @materializer(
      query: "github_repository"
      arguments: [
        { name: "owner", field: "owner" }
        { name: "name", field: "name" }
      ]
    )
}
This will extend the type fauna_Repository, which is the type Repository from the Fauna GraphQL API, with all the fields returned by the query github_repository. The query github_repository is the query that is generated by the StepZen CLI when importing the GitHub GraphQL API. The arguments that are passed to the query are the fields owner and name from the fauna_Repository type.
We can now use the githubDetails field to query the GitHub GraphQL API, and we will use the @materializer directive to query the github_repository query from the GitHub GraphQL API.
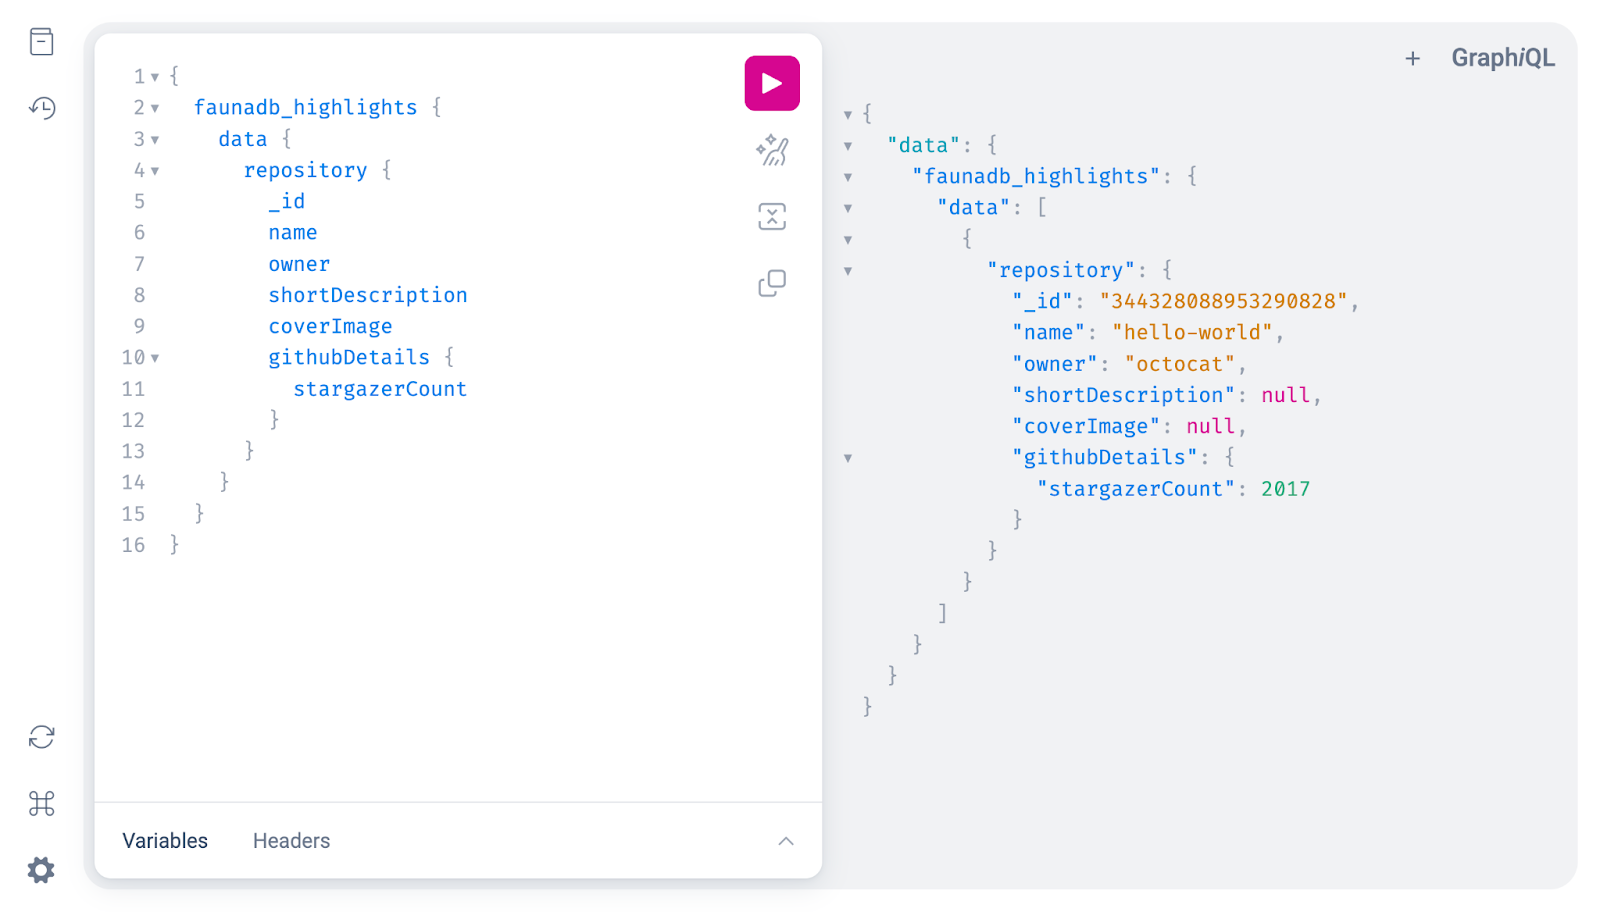
You can also query a single highlight and get all the other fields available on the return type of github_repository, which is github_Repository. StepZen will ensure that the data from the two GraphQL APIs are composed into one single GraphQL API, and no unnecessary data is requested or returned.
Conclusion
In this post, we've used StepZen to combine the GitHub GraphQL API and the FaunaGraphQL API into one single GraphQL API. This makes it possible to query the data from both GraphQL APIs in one query. Composing data in GraphQL is also called federation. We've learned how to set up a GraphQL API with Fauna and fill it with data from GitHub, and how to use StepZen to combine the data from two GraphQL APIs into one single GraphQL API. And how to extend types with the @materializer directive.
You can find the complete code example for this blog post on the StepZen GitHub page.
Follow StepZen on Twitter or join our Discord community to stay updated about our latest developments.

