How to Set Up a GraphQL Endpoint on a Database

 Anant Jhingran
As some of you know, I have been working around databases for about four decades (that does date me!). From the early days of System R and Ingres, through the commercial engines of DB2 and Oracle, the open sources of MySQL and Postgres, to the current generations of NoSQLs like MongoDB and Cassandra and scalable SQL like CockroachDB and Yugabyte, anyone who has predicted the demise of databases has proven to be wrong. SQL as the query language has persisted, evolved, and improved, but the basic
select * from foo where x = 1 group by y
is the language known to hundreds of thousands of developers. Why is that? Because databases just work, and how can you say that about too many things?
As a frontend developer, you want to see data in logical business constructs. Say a customer has one or more addresses; your application would love to see data like this:
{
    "customer": {
        "name": "John Doe",
        "email": "john.doe@example.com",
        "addresses": [
            {
                "street": ...
            }
        ]
    }
}
The good thing is that there is already a query language that produces data like this—GraphQL. Awesome! However, the database that you (or someone on your team!) love stores data in mysterious ways.
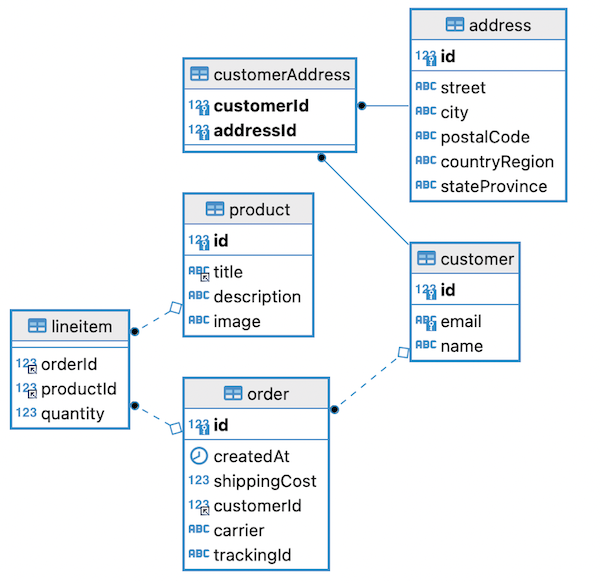
So you have this impedance mismatch problem. You have a view of the data, expressible in GraphQL, that must match the implementation, which looks like a set of tables and join tables and all the other artifacts that you'd rather wish away.
Solving this impedance mismatch problem is easy to do with StepZen.
Get started
- Install the StepZen CLI:
npm install -g stepzen. - If you have not already done so, log in to StepZen:
stepzen loginusing your Admin (stepzen.io) key, which is available from your StepZen dashboard.
Now, follow this series of steps:
Set up a GraphQL endpoint
-
Create your project folders
mkdir introspection; cd introspection; mkdir stepzen; cd stepzen -
Next, let's add data from MySQL. We have provided a prebuilt MySQL database.
stepzen import mysqlYopu are prompted to provide a set of information. Use the following:
- hostname: db.introspection.stepzen.net
- database name: introspection
- username: testUserIntrospection
- password: HurricaneStartingSample1934
That's it. This one command creates the artifacts for the
mysqldatabase. -
stepzen startThe CLI asks you for your API endpoint. Accept the default or choose whatever two part name you like. You can now test the endpoint from the StepZen dashboard in the "Explorer" tab. A good query to try is:
{
    getCustomer(id: 1) {
        email
        name
        orderList {
        carrier
        shippingCost
        trackingId
    }
}
From the Explorer in the dashboard, you can also see the schema that was generated for you.
Congrats! With a couple of simple steps, you have a running GraphQL endpoint against a MySQL database. Cool, right?
What did we do here?
- In one step, we connected to a MySQL database. This connection:
- Automatically generated the types based on the table definitions.
- Did not generate any types for tables that were just link tables.
- Automatically stitched types together.
- Automatically generated queries against the types.
Modifying the auto-generated code
You might want to change the code in some ways. Instead of starting from stepzen import mysql, you can start from scratch, and create your own queries and types in a schema file. But for now, this section describes how to modify the generated code.
Add more queries
What if you wanted to be able to find customers using their emails? Simple. Add this block of code in the type Query section of mysql/mysql.graphql.
getCustomerByEmail (email: String!): Customer
    @dbquery (type: "mysql", query: "select * from customer where email = ?", configuration: "mysql_config")
Save the file. Your endpoint is automatically re-deployed. Now you can use the Explorer tab to build a query like:
query MyQuery {
  getCustomerByEmail(email: "john.doe@example.com") {
    name
  }
}
What did we just do? @dbquery is a custom directive. It takes one of two parameters: either table (in which case it makes some default assumptions of how to access data), or query (in which case, you specify how to access the data). In the latter, the ? does parameter substitution in the order in which they appear in the query, and here, since there is only one, the parameter email gets passed down into the SQL statement.
Look through the generated code for other examples of such queries.
Change the name of a query or type
Sometimes the autogenerated name of the query or type is not what you want.
-
Want to change the name of a query? Easy. For example, to change
getAddressUsingCustomerAddresstocustomerAddress, changegetAddressUsingCustomerAddresstocustomerAddresseverywhere it appears. Use your favorite IDE to replace all occurrences. -
Want to change the name of a type? For example,
type Producttotype Item.- Change
type Producttotype Item. - Change every query or mutation that returns either
Productor[Product]to returnItemor[Item].
- Change
Save your changes, and your new names appear.
Change the name of fields
Sometimes, the auto-generated names of fields are not to your liking. Changing field names is also easy. For example, to change the field title in type Product to name:
- Change the field in the definition
type Product. - Everywhere there is a query that returns either
Productor[Product], remove the parametertable: "product"and add a new parameterquerywith aselect *, title as item...:getProductList: [Product] @dbquery( type: "mysql" query: "select *, title as item from product" configuration: "mysql_config" ) getProduct(id: Int!): Product @dbquery( type: "mysql" query: "select *, title as item from product where id = ?" configuration: "mysql_config" )
Basically, we have to make the MySQL query return the title (stored internally in MySQL) as item (needed for the GrahphQL definitions). That's it.
Adding more to our schema
Now that you've started with a MySQL database, there is no need to stop there. Let us connect the orders in our GraphQL endpoint with real, live, delivery information. This is really simple.
-
Open a terminal, navigate to the
stepzendirectory ofintrospection, and issuestepzen import UPSIt asks whether you want to use your keys to access
UPSor StepZen's. Select ours. -
If you have
stepzen startrunning from the previous step in the other terminal, you have to do nothing, otherwise issuestepzen start. -
Go the StepZen Explorer in the dashboard, and issue the following query:
{
    getCustomer(id: 1) {
        email
        name
        orderList {
        carrier
        shippingCost
        trackingId
        delivery {
            status
            statusDate
        }
    }
}
Voila! You have connected the data from MySQL to real, live data from UPS.
Where to go from here
If you look in your stepzen directory, you see that in mysql/mysql.graphql, there is a set of mutations available for you. Mutations won't work in the (read-only) database we provided you but you can explore mutations to create Customer, Order, etc. if you configure your own database. If you would like the sample ddl and data load files we used for this demo please drop us a note on our Discord channel.
Note: If your database is complex, or it is slow to respond, your stepzen import mysql command might time out. We are making it work for more and more complex schemas, but for now, you can always manually construct your types and the SQL calls that will support them (see examples above). And do let us know if support for more complex schemas is critical for your project.
As always, we encourage and welcome your feedback or questions on Discord.