Handling Authentication in GraphQL with JWT and Auth0

 Samuel Hill
JSON Web Token (JWT) is a signed, URL-safe token that stores and encrypts information about a user in a JSON object. This form of authentication is growing in popularity and is widely used for handling a user's session in an application.
What makes a JWT token secure?
The security of a JWT is reliant on the signature of the application issuing the token. For example, Auth0 provides a JWT to an application. To ensure a JWT is provided by Auth0 in the application, the application checks with Auth0's JSON Web Key Sets (JWKS) to validate the token.
Overview
Let's look at how the JWT Validation architecture will come together in this example.
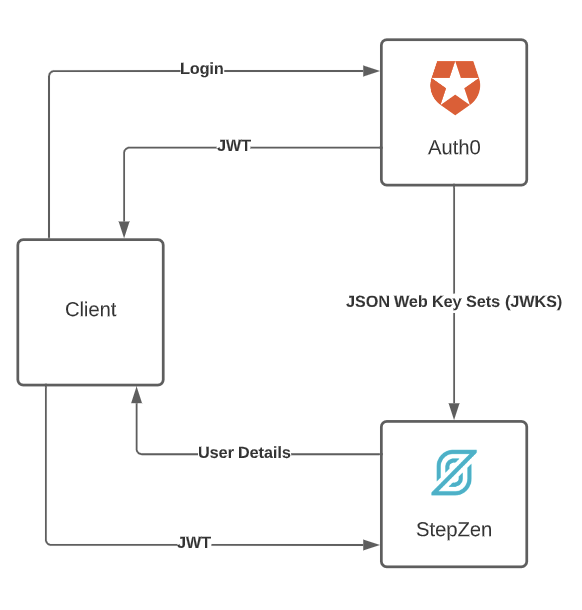
- A user of the application, the client, logs in or signs up with an Auth0 login provider.
- The user is validated and returned to the application with a JWT.
- The JWT is sent to the server-side API in StepZen.
- StepZen ensures the JWT signature is valid by checking with the Auth0 JWKS. (step 1 of @sequence)
- StepZen returns the payload data. (step 2 of @sequence)
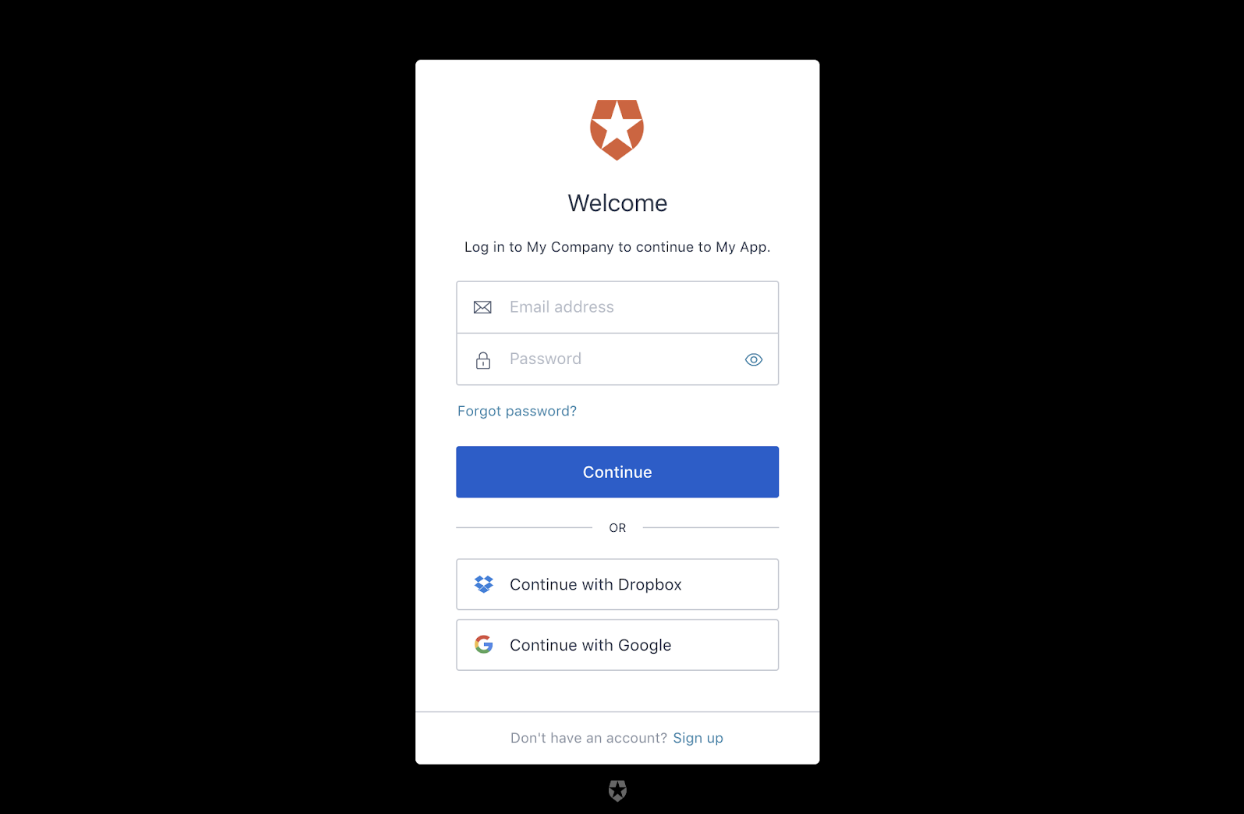
Step 1: User login
The user logs in with the universal login provided by Auth0.
Step 2: JWT is generated
The user is redirected back to the application with a JWT labeled idToken and other user information.
NOTE: This object was generated by using the
Auth0Providerin next-auth
{
    user: {
      id: '1234-56789-4b07-8e55-6e4f0f9bd708',
      name: 'sam',
      email: 'sam@stepzen.com',
      metadata: { account: 'sampleaccount' },
      idToken: 'eyJhbGciOiJSUzI1NiIsInR5cCI6IkpXVCJ9.eyJzdWIiOiIxMjM0NTY3ODkwIiwibmFtZSI6IlNhbSBIaWxsIiwibWV0YWRhdGEiOnsiYWNjb3VudCI6InNhbXBsZWFjY291bnQifSwiYWRtaW4iOmZhbHNlLCJpYXQiOjE1MTYyMzkwMjJ9.EJWpAOULAcYFLpkCu40VVTxmin0JvWP1HvxfKW3ihdRGNjHL08z-IKNtPvQa1GdF-N30ftdklYxtEeaLpUvSE-mSkKm_In_OY3kvQzqBJFZQeeV_vwQwU30J4KHlndCC9wB-PYBZt3Ydm-amTRGtEoOLgPBuY-U_WYc76305ckTBJNnp0tYMq67DGfLjQNGGjIEZ9_v2T3_i5DTA45Av9oCFiPA7aWtAGftyPG0uYtZEI0YjwrRbMI3RAsXlMhvuQ6NL-kdR7qzDcqfAhEuBCNn5dopCR1q5-lEDRfDuf-PPlwEbTHttdcnps1tbGtvrZ9RBsaTvciJvYmP7G-yGbA'
    },
    expires: '2022-11-18T20:35:29.017Z'
}
Step 3: Pass JWT as Bearer token in GraphQL Request to StepZen
If you take the idToken from above and paste it into jwt.io, you can see the payload below, which is extracted from the token.
{
  "sub": "1234567890",
  "name": "Sam Hill",
  "metadata": {
    "account": "sampleaccount"
  },
  "admin": false,
  "iat": 1516239022
}
This is the same JWT we will pass to StepZen as a bearer token in an API request. For this example, if the user asks for the appropriate account, we will return that account's payment_plan.
async function executeFetch() {
  const headers = {
    Authorization: `Bearer ${user.idToken}`,
    'Content-Type': 'application/json',
  }

  const body = {
    query: `query accountDetailsQuery($account: String!) {
      user_details(account: $account) {
          payment_plan
      }
    }`,
    variables: {
        account: user?.metadata?.account, // sampleaccount
    },
  }

  const response = await fetch("https://account.stepzen.net/api/jwt-blog/__graphql", {
    method: 'POST',
    headers: headers,
    body: JSON.stringify(body),
  }).then(response => {
    if (response.ok) {
      return response.json()
    } else if(response.status === 404) {
      return Promise.reject({'error': 404})
    } else {
      return Promise.reject({'error': response.status})
    }
  })
  .then(data => {
    return data.data
  })
  .catch(error => {
    return {'error': error}
  });

  return response
}
Step 4: StepZen checks that the account is associated with the JWT payload.
How will we ensure the account passed in deployVariables is associated with the account in the JWT payload?
First of all, why do we need to do this? It is pretty simple. If someone can replicate the GraphQL request above and we do not check with Auth0 that the JWT is valid, they could obtain information about any users in the application.
Check that the JWT is valid and signed properly by Auth0
The JWT is passed as a bearer token in the headers of the GraphQL request to StepZen.
StepZen validates the Bearer token in the GraphQL request with Auth0's JSON Web Key Sets (JWKS). An Auth0 JWKS is found at the Auth0 account's unique endpoint, https://auth0account.us.auth0.com/.well-known/jwks.json.
We need to add two access policies in the StepZen config.yaml.
- StepZen, by default, asks for an
apikeyrather than abearertoken forAuthorization. We need to tell StepZen that if the example query,user_details, is executed StepZen should look for abearertoken (JWT token) rather than anapikey.
access:
  policies:
    - type: Query
      policyDefault:
        condition: 'false'
      rules:
        - name: Allowed queries
          fields:
            - user_details
          condition: '?$jwt'
- Check the signature of the JWT is valid by providing the JWKS from Auth0.
deployment:
  identity:
    keys:
      - algorithm: rs256
        issuer: https://auth0account.us.auth0.com
        key: >
          {{ ADD JWKS HERE }}
Here is the complete config.yaml. This can go below any other configurations in the file.
access:
  policies:
    - type: Query
      policyDefault:
        condition: 'false'
      rules:
        - name: Allowed queries
          fields:
            - user_details
          condition: '?$jwt'
deployment:
  identity:
    keys:
      - algorithm: rs256
        issuer: https://dev-t8sgerx2.us.auth0.com
        key: >
          {{ ADD JWKS HERE }}
With this step done, we can now ensure a GraphQL request is requested by a valid user from our application. A user that provides any dummy JWT as the bearer token will now be denied access to the endpoint.
Check the JWT payload contents
The next step is to ensure the validated user can only ask for their account data and not any account data from the endpoint.
Let us revise our ExecuteFetch() function.
  const body = {
    query: `query accountDetailsQuery($account: String!) {
      user_details(account: $account) {
          payment_plan
      }
    }`,
    variables: {
        account: user?.metadata?.account, // sampleaccount
    },
  }
From the query above, this user should only be able to ask for sampleaccount (the user's account) information. Lucky us, this account is also provided in the JWT. And with a validated JWT from the step previous, we can use this payload data in the JWT to check if the user can ask for the account information of sampleaccount.
This leads us to the first step in the @sequence.
A query of impersonatedAccount will use the parameter transforms
type ImpersonatedAccount {
  """
  The requested account name.
  """
  requested: String!

  """
  The account name recorded in the JWT.
  """
  self: String!
}

type Query {
  """
  Check whether or not an Auth0-issued JWT from the Authorization header allows
  access to a given account, and return an `ImpersonatedAccount`.

  If the requested account matches either the primary account or one of the
  linked accounts in the JWT, then return the requested account credentials.
  Otherwise the credentials in the returned object are set to  `null`.
  """
  impersonatedAccount(account: String!): ImpersonatedAccount!
    @rest(
      endpoint: "stepzen:empty"
      transforms: [
        {
          editor: """
          jsonata:(
            $merge([
              {"requested": $get("account")},
              {"self": $get(metadata.account}
            ])
          )
          """
        }
      ]
    )
}
Let's look back at how metadata.account is provided in the JWT payload.
{
  "sub": "1234567890",
  "name": "Sam Hill",
  "metadata": {
    "account": "sampleaccount" // This must match the account being requested in the query variables
  },
  "admin": false,
  "iat": 1516239022
}
If these two account strings do not match, null is returned. If the strings match, we execute the second query of the @sequence, user_details_internal.
type User_Details {
  payment_plan: String
}

type Query {
  user_details(account: String!): User_Details
      @sequence(
        steps: [
          {
            query: "impersonatedAccount"
          }
          {
            query: "user_details_internal"
            arguments: [{name: "account", argument: "account"}]
          }
        ]
      )
  user_details_internal(account: String!): User_Details
    @rest(
      endpoint: "https://dummyendpoint.com/"
      configuration: "stripe_config"
    )
}
The second step of the sequence can be any data source for your application. We pass the validated account as an argument and the @sequence returns information about that specific account by executing the second step, user_details_internal.
Amazing! You can validate your application's dynamic users with the business logic of a StepZen GraphQL schema. The server-side validation layer accomplishes the following steps when executing a GraphQL request.
- A JWT is validated with the JWKS provided by Auth0
- The payload of the JWT is extracted and compared to the requested account in the query variables.
- If a successful match is found, the account in the payload is merged with the requested account. This executes the second step of the
@sequencequery. - The query can return any information about the requested account without compromising any data of other accounts on the platform.
Where To Go From Here
To learn more on how to use @sequence, check out our docs. Check out the docs on connecting other backends to your endpoint - GraphQL.
If you've got more questions or want to hang out, hit us up on Discord; we'd love to chat.