Building A Data Layer for Microservices With GraphQL And StepZen

 Roy Derks
Building A Data Layer for Microservices With GraphQL And StepZen
GraphQL is the perfect technology to bring your microservices together. You can use GraphQL as a data layer for these microservices and combine the data from all these services into a single, unified API. But building this data layer can be very time-consuming, as you need to connect the microservices into one schema. In this post, you'll learn step-by-step how to use StepZen to build this data layer in a declarative way using GraphQL directives. Without having to write any resolvers!
TL;DR: You can find the repository with the complete source code for this post here.
Why GraphQL as Data Layer?
When you have a microservices architecture that your (front-end) clients consume, it is best not to expose these microservices directly. Instead, build a gateway or data layer that exposes these microservices to each other and the clients consuming them.
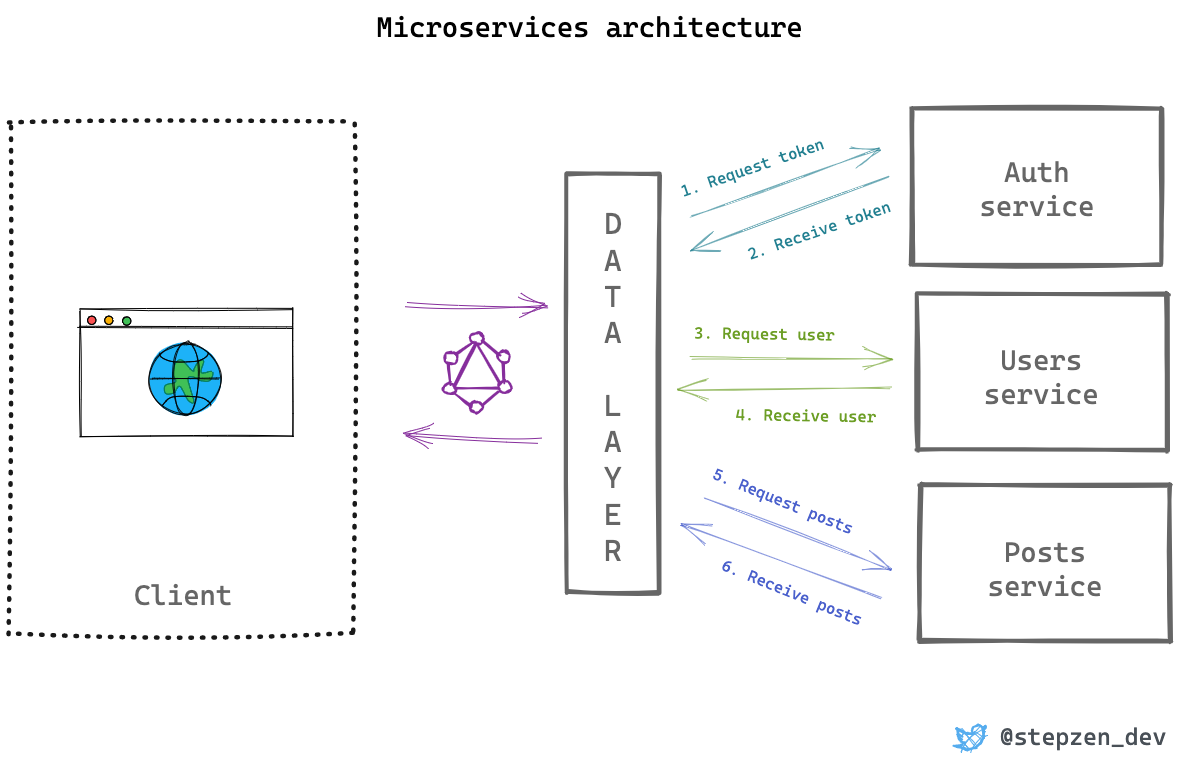
When using StepZen, these microservices don't need to use GraphQL. You can create a GraphQL data layer for microservices that use REST, GraphQL, or any database. You can combine microservices that use REST with GraphQL microservices and vice-versa! In this article, you can see how GraphQL will help you create this data layer. But let's review some of the advantages:
- With a data layer, you can hide your microservice architecture from the client interacting with these services. You often want to hide your underlying architecture not to give away critical information about how you orchestrated your services.
- The data layer becomes the single entry point to your microservices. This reduces the number of requests from outside your microservices architecture. For example, having to call your authentication service directly to verify a token before every request, the data layer can take care of these round trips.
- Consuming your microservices becomes more straightforward, as you have a single API to consume instead of a dozen different ones. This doesn't only save you time to document and spec all the APIs of your microservices - it means that the consumers of the API also have only one specification they need to understand.
Using StepZen, you can speed up the process to build this data layer and don't have to worry about performance. StepZen automatically creates a fully performant GraphQL API for you, based on the schema that brings together the microservices, as you'll learn in the next section.
Building a Data Layer with StepZen
In the first part of this post, you've learned why you need a data layer for your microservices. And GraphQL is the perfect solution for building this data layer.
This second part will focus on building the data layer for three microservices. These microservices can be consumed with REST and handle authentication, user details, and post details. Using StepZen, you'll combine these services in one API to authenticate first and then get the information for posts, including the user who created the post.
If you haven't used StepZen before, please see our documentation first. In the documentation, you'll learn how to set up a StepZen account and install the npm library on your local machine.
After installing StepZen on your machine and creating an account, you can follow the steps in this post.
Setting up the project
The repository with the source code for this post consists of a JavaScript project with three (mock) microservices. Before connecting these services with StepZen, you need to create schemas for the REST APIs that they expose.
You can run the services by following the steps in the project README or by running yarn install and yarn start after cloning the repository. The microservices become available on localhost on ports 3001 to 3003 and through an HTTPS tunnel. To use these services within StepZen, you need to use the tunneled endpoints logged to your terminal when you start the services with yarn start.
The values from the local tunnel must be added to the config.yaml file so they can be used in the GraphQL schemas. When you start the microservices, a message like this will be logged in your terminal:
Posts service is running on https://black-mouse-61.loca.lt
Users service is running on https://empty-robin-94.loca.lt
Auth service is running on https://smart-bird-79.loca.lt
The hostnames the services are running need to be added to config.yaml for every service. That way, they can be used in the GraphQL schema when you link each set of configurations. Following the example values above, the configuration will look like this:
# config.yaml

configurationset:
  - configuration:
      name: auth_service
      client_id: test
      client_secret: test123
      hostname: 'smart-bird-79.loca.lt'
  - configuration:
      name: posts_service
      hostname: 'black-mouse-61.loca.lt'
  - configuration:
      name: users_service
      hostname: 'empty-robin-94.loca.lt'
Make sure to replace the values above with the values that are created when starting the microservices.
Creating schemas for microservices
Let's start with the authentication service. This service exposes the endpoint /api/token, from which you can get an authentication token using OAuth. The protocol requires you to provide a valid client id and client secret to this endpoint, a typical authentication pattern for machine-to-machine communication.
You can call the endpoint https://$hostname/api/token?grant_type=client_credentials&client_id=$client_id&client_secret=$client_secret. The values for hostname, client_id and client_secret can be found in the file config.yaml.
When you send a request to this endpoint, the service will return a Bearer token if the credentials are correct. This token is needed to request the user and posts detail from the two other microservices. The GraphQL schema for this authentication service is in the file services/auth/index.graphql and will look like this:
# services/auth/index.graphql

type Auth {
  id: Int!
  access_token: String!
}

type Query {
  token: Auth
    @rest(
      endpoint: "https://$hostname/api/token?grant_type=client_credentials&client_id=$client_id&client_secret=$client_secret"
      configuration: "auth_service"
    )
}
It has a query to get the token configured with StepZen's @rest directive. This query automatically gets the client id and client secret from the file config.yaml. The response of that query is of type Auth and includes the token.
The microservice to get posts needs to get the token before it can return the post details. To get the token, it must call the token query from the authentication service first. This is configurable in the schema for the posts service in services/posts/index.graphql with the StepZen @sequence directive.
To this directive, you pass the different steps or combinations of operations it should take before returning the data.
# services/posts/index.graphql

type Post {
  id: Int!
  title: String!
  imageUrl: String!
  author: Int
}

type Query {
  posts(access_token: String!): [Post]
    @rest(
      endpoint: "https://$hostname/api/posts"
      headers: [{ name: "Authorization", value: "Bearer $access_token" }]
      configuration: "posts_service"
    )

  getPosts: [Post] @sequence(steps: [{ query: "token" }, { query: "posts" }])
}
In the GraphQL schema above, you see that the posts query needs the token to get the posts data. Instead, you can pass this token manually as a parameter to the query or use the getPosts query. This query will follow a @sequence and execute the token query from the authentication service. The query response is passed on to the posts query as arguments.
You can follow the same structure for the users service that also needs the token before returning user details:
# services/users/index.graphql

type User {
  id: Int!
  name: String!
}

type Query {
  user(id: Int!, access_token: String!): User
    @rest(
      endpoint: "https://$hostname/api/users/$id/"
      headers: [{ name: "Authorization", value: "Bearer $access_token" }]
      configuration: "users_service"
    )

  getUser(id: Int!): User
    @sequence(steps: [{ query: "token" }, { query: "user" }])
}
Before you can use the microservices through GraphQL with StepZen, you must set up the configuration for StepZen itself. In the file stepzen.config.json, you add (i) the endpoint for the GraphQL API and (ii) the root for the project folder:
{
  "endpoint": "api/datalayer",
  "root": "./"
}
Also, a central index.graphql file is needed to bring together the schemas of the microservices:
# index.graphql

schema
  @sdl(
    files: [
      "services/auth/index.graphql",
      "services/posts/index.graphql",
      "services/users/index.graphql"
    ]
  ) {
  query: Query
}
After adding these files, you can run stepzen start from your terminal in the project's root directory to explore the endpoint from the StepZen dashboard explorer.
Alternatively, you can also run stepzen start --dashboard=local. This creates a GraphiQL IDE on http://localhost:5001/api/datalayer with a schema that combines all the schemas of the individual microservices.
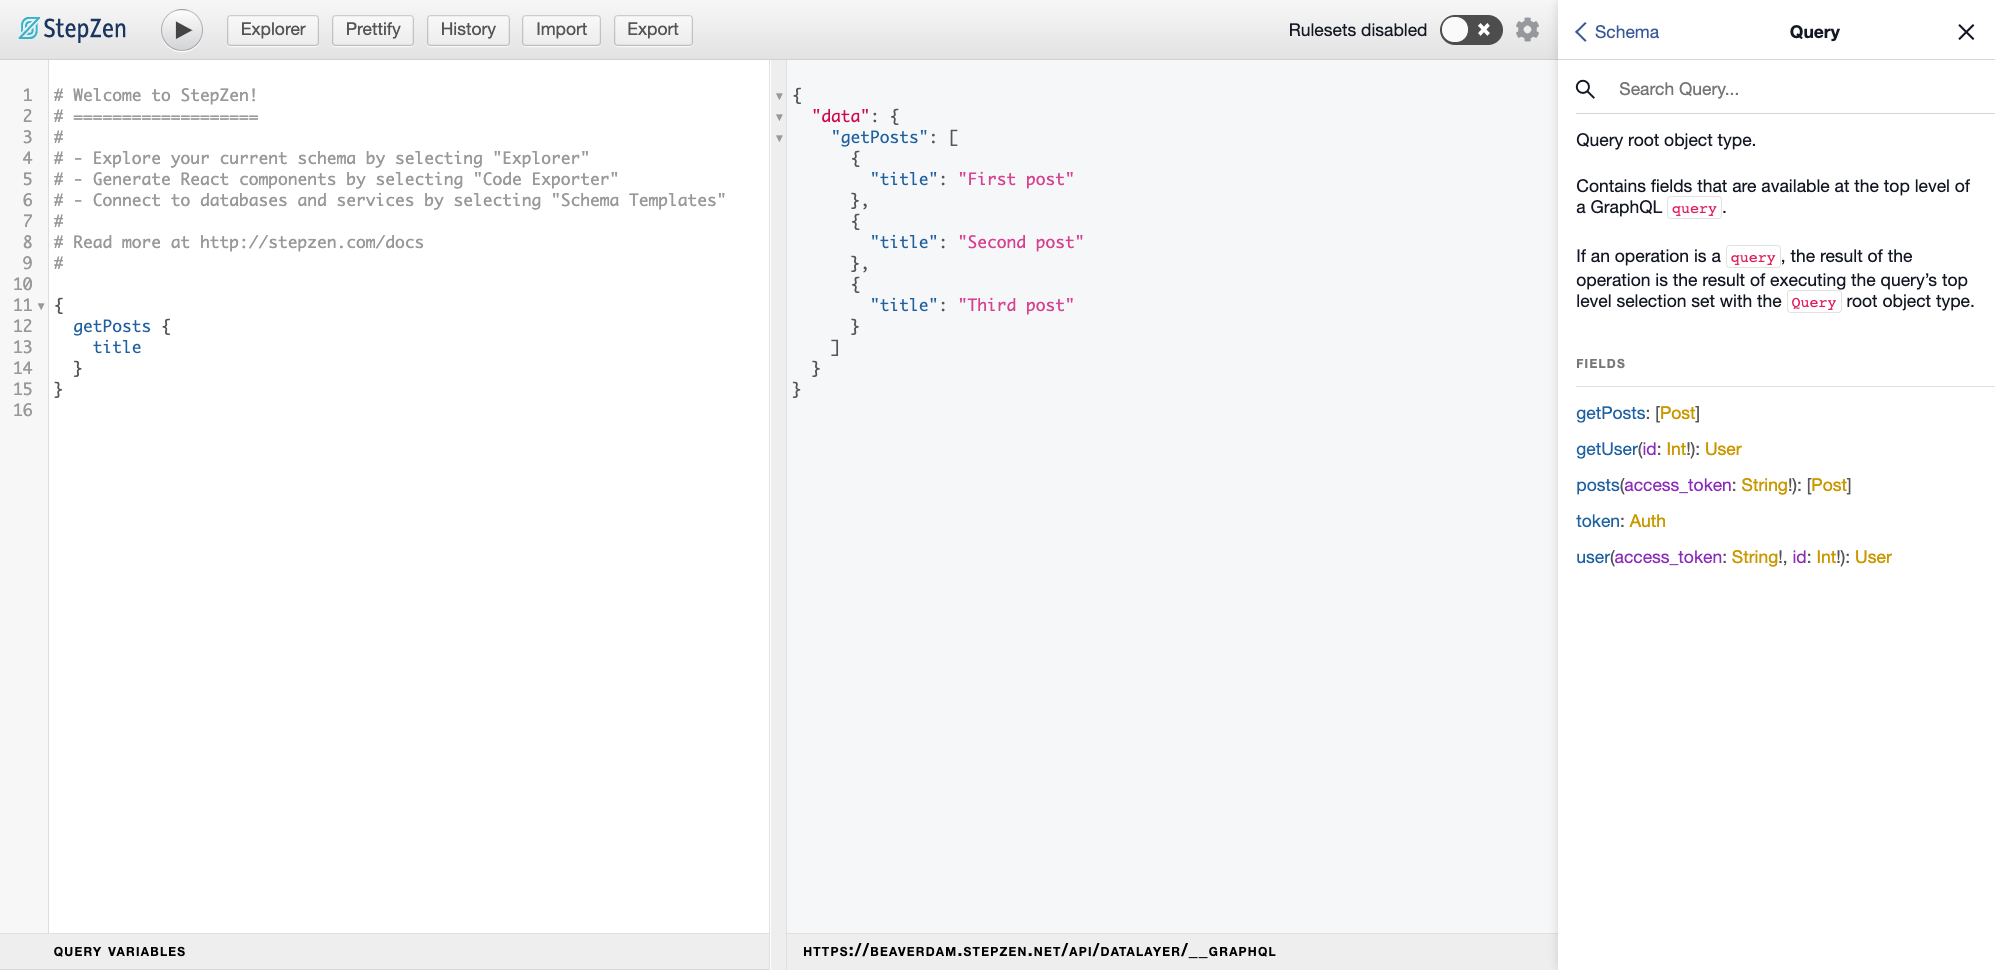
From GraphiQL, you can use queries that will get authentication, posts, and user details. But you can make even more powerful connections, as you'll see in the next section.
Connecting Microservices
Suppose you want to combine the posts and users microservices instead of only with the authentication service. Usually, when you combine services in StepZen, you can use the @materializer directive. But as all the services are decoupled, they need to first authenticate with the token query. You need to use @sequence to combine them instead. To do so, create a new file called datalayer.graphql that is used as an aggregator for types and operations that aren't tied to just one microservice.
# datalayer.graphql

type UserPosts {
  post_id: Int!
  username: String!
  title: String!
}

type Query {
  collect(username: String!, title: String!): UserPosts @connector(type: "echo")

  getUserPosts(id: Int!): [UserPosts]
    @sequence(
      steps: [
        { query: "token" }
        { query: "user" }
        {
          query: "postsByUser"
          arguments: [{ name: "user_id", argument: "id" }]
        }
        {
          query: "collect"
          arguments: [
            { name: "username", field: "name" }
            { name: "title", field: "title" }
          ]
        }
      ]
    )
}
The type UserPosts is the response type for a query called getUserPosts, which you can use to get a list of all the posts of a user. The user's name will be appended as well, which needs to come from the user's microservice. To retrieve the posts, the query postsByUser from the posts service needs to be called. This needs to be added to its schema too:
# services/posts/index.graphql

type Post {
  id: Int!
  title: String!
  imageUrl: String!
  author: Int
}

type Query {
  posts(access_token: String!): [Post]
    @rest(
      endpoint: "https://$hostname/api/posts"
      headers: [{ name: "Authorization", value: "Bearer $access_token" }]
      configuration: "posts_service"
    )

  postsByUser(user_id: Int!, access_token: String!): [Post]
    @rest(
      endpoint: "https://$hostname/api/posts?author=$user_id"
      headers: [{ name: "Authorization", value: "Bearer $access_token" }]
      configuration: "posts_service"
    )

  getPosts: [Post] @sequence(steps: [{ query: "token" }, { query: "posts" }])
}
Finally, the file index.graphql needs to be altered, so it includes the schema for the data layer:
# datalayer.graphql

schema @sdl(files: ["datalayer.graphql", "services/auth/index.graphql", "services/posts/index.graphql", "services/users/index.graphql"]) {
  query: Query
}
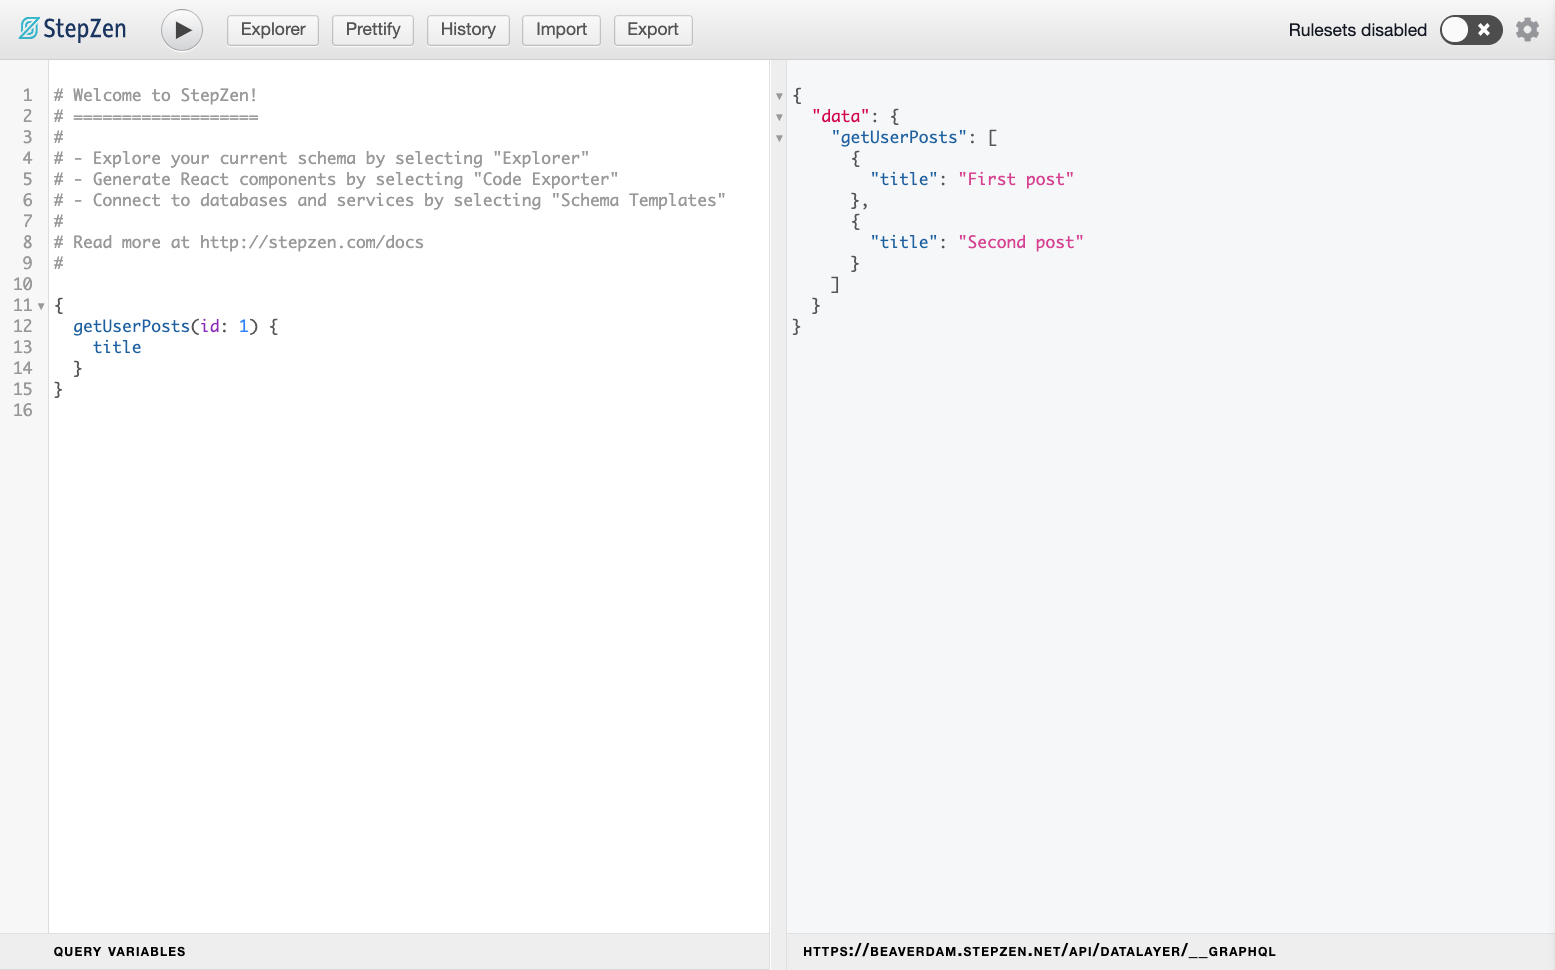
This last change allows you to query all the posts from a user with getUserPosts. To this query, you can pass the user id 1, to find the user and the posts of that user:
query {
  getUserPosts(id: 1) {
    title
  }
}
An example of this is displayed below in the GraphiQL IDE:
Summary
In this post, you've connected several REST APIs on top of microservices. You can find the complete source code for implementing the data layer here. There's much more you could do when using StepZen as a data layer for your microservices. For example, StepZen can also handle GraphQL APIs or any databases directly.
Learn more by visiting StepZen Docs. Try it out with a free account, and we'd love to get your feedback and answer any questions on our Discord.

