Build a Mobile Login with React Native, Google Sign-In & FaunaDB

 Samuel Hill
Connecting all the sources that we need to get data for our frontend can sometimes be more complex than building the frontend. Your application may use third-party services for things like authentication, APIs like a headless CMS for content, while storing data in a data API service like Fauna. GraphQL combined with StepZen makes it easy to bring all the pieces together into a single, consolidated API endpoint.
In this post, I'll demonstrate how to build a login screen for a mobile app built using React Native with Google Sign-In, FaunaDB, and StepZen. If you'd like to see a live-code demo video looking at the project covered in this blog posts, check it out on YouTube. You can also see the code and clone the repository on GitHub.
Getting Set Up
Let's get you set up with the accounts and tools you'll need to build this project.
Setting Up StepZen
Create a StepZen account first, in order to get your API and admin keys (click the "Dashboard" button on the top right once you log in to see where they are).
Next, you'll need the StepZen CLI in order to deploy and test your StepZen GraphQL endpoint. To install the CLI, follow the instructions in the docs.
Setting up the Expo React Native App
Expo is an easy to use platform for building React Native apps that we will use for this project. First, install the CLI so we can jump start our app.
npm install --global expo-cli
Initialize the new app. When prompted, select tabs (TypeScript), several example screens and tabs using react-navigation and TypeScript. This will install many dependencies that are designed to improve the React Native navigation experience.
We'll need to
expo init faunadb-login-demo
cd faunadb-login-demo
Set Up a Fauna Database
Go to Fauna.com and click Sign Up. You will be taken to the Fauna dashboard.
Create a new database in Fauna named stepzen-fauna. Use the "Classic" region group and be sure to check the "Use demo data" option.
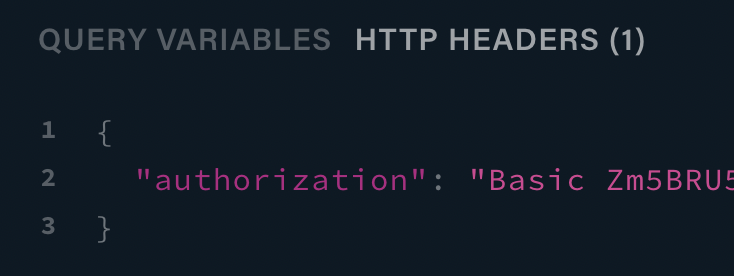
Once the database is created, open the GraphQL menu option within the Fauna Dashboard. You'll need the HTTP authorization header at the bottom of the Playground to use in your config.yaml file.
The schema below defines the user information we plan to store in Fauna. Copy the schema and save it as a .graphql file. Upload the file to the Fauna GraphQL Playground by selecting Merge Schema. This will allow us to write the users that log in to our application to the FaunaDB User Collection.
type User {
  email: String!
  familyName: String!
  givenName: String!
  id: String!
  name: String!
  photoUrl: String!
}

input UserInput {
  email: String!
  familyName: String!
  givenName: String!
  id: String!
  name: String!
  photoUrl: String!
}

type MutationUser {
  createUser(data: UserInput!): User!
}

type QueryUser {
  findUserByID(id: ID!): User
}
Now that we have Fauna set up, we need to tell our StepZen API how to connect to it using our Fauna API key. On your local machine, go to the root of your faunadb-login-demo project and create a StepZen folder.
mkdir stepzen && cd stepzen
Create a config.yaml file in the folder with the following contents (replacing Basic MY_FAUNA_KEY with the information you copied from the GraphQL Playground in the Fauna dashboard).
configurationset:
  - configuration:
      name: fauna_config
      Authorization: Basic MY_FAUNA_KEY
Now that we're done with the setup, we need to create our GraphQL schema code that builds our API within StepZen.
Creating Google Sign-In Client IDs
First, create a Google Cloud account. There are free trials available.
Once created, go to "Credentials" in the Google Cloud dashboard and create two oAuth clientIds for Android and iOS applications by clicking "Create Credentials" and then "OAuth client ID". Copy and save these. We'll need then when we are creating the React Native app and we install the dependency expo-google-app-auth.
Creating a FaunaDB Mutation in the StepZen Schema
Next, create a file named fauna.graphql within the stepzen directory containing your config.yaml and copy the code below into it.
The schema code for our GraphQL endpoint looks very similar to the schema we uploaded to Fauna. The key difference here is in the query and mutation code. Notice the @graphql? This is a StepZen custom directive for connecting a StepZen API to an existing GraphQL API. In our simple example, the two are almost identical, but, in most cases, we'd be connecting this schema with data coming from other sources like REST APIs or databases – and StepZen makes that part easy!
type User {
  email: String!
  familyName: String!
  givenName: String!
  id: String!
  name: String!
  photoUrl: String!
}

input UserInput {
  email: String!
  familyName: String!
  givenName: String!
  id: String!
  name: String!
  photoUrl: String!
}

type Mutation {
  createUser(data: UserInput!): User!
    @graphql(
      endpoint: "https://graphql.fauna.com/graphql"
      configuration: "fauna_config"
    )
}

type Query {
  findUserByID(id: ID!): User
    @graphql(
      endpoint: "https://graphql.fauna.com/graphql"
      configuration: "fauna_config"
    )
}
Note that the endpoint https://graphql.fauna.com/graphql may change based on the location you selected. If you selected classic, then that should be endpoint used. Be sure to add the correct endpoint from your FaunaDB GraphQL Explorer.
Add the fauna.graphql schema to an index.graphql file in the same stepzen directory.
schema @sdl(files: ["fauna.graphql"]) {
  query: Query
}
Our StepZen folder should have the file structure below.
.
├── stepzen
    ├── index.graphql
    ├── fauna.graphql
    └── config.yaml
Using the StepZen CLI, run the following command.
stepzen start
The CLI will suggest a name for the endpoint (in the format FOLDER_NAME/ENDPOINT_NAME) but we can specify any name we want. Let's use demo/native-login. Note that the CLI will generate a file, stepzen.config.json, that tells StepZen the name the API endpoint so that it can skip this step on subsequent requests.
Creating our React Native App
First, in the root of our project, let's install some dependencies. You can use npm or yarn.
yarn add @apollo/client graphql expo-google-app-auth expo-blur react-native-reanimated
In our App.tsx file, we need to use the @apollo/client to add our StepZen endpoint and admin key to the frontend project.
import {
  ApolloClient,
  ApolloProvider,
  createHttpLink,
  InMemoryCache,
} from '@apollo/client'
import 'react-native-gesture-handler'
import { StatusBar } from 'expo-status-bar'
import React from 'react'
import { SafeAreaProvider } from 'react-native-safe-area-context'

import useCachedResources from './hooks/useCachedResources'
import useColorScheme from './hooks/useColorScheme'
import Navigation from './navigation'

const client = new ApolloClient({
  link: createHttpLink({
    credentials: 'same-origin',
    headers: {
      Authorization: `Apikey {{your_key}}`,
    },
    uri: 'https://youraccountname.stepzen.net/demo/native-login/__graphql',
  }),
  cache: new InMemoryCache(),
})

export default function App() {
  const isLoadingComplete = useCachedResources()
  const colorScheme = useColorScheme()

  if (!isLoadingComplete) {
    return null
  } else {
    return (
      <ApolloProvider client={client}>
        <SafeAreaProvider>
          <Navigation colorScheme={colorScheme} />
          <StatusBar />
        </SafeAreaProvider>
      </ApolloProvider>
    )
  }
}
It's that simple to connect a StepZen API to a React Native frontend project. FaunaDB in our StepZen API is ready to be used in the React Native app. Running expo start at this point will display "Tab One" and "Tab Two" from the ./screens folder.
In the App.tsx, we are going to be navigating between the LoginScreen and UserScreen which we'll be creating later, so we need to add a <NavigationContainer> for both pages.
export default function App() {
  const isLoadingComplete = useCachedResources()

  if (!isLoadingComplete) {
    return null
  } else {
    return (
      <ApolloProvider client={client}>
        <SafeAreaProvider>
          <NavigationContainer>
            <Stack.Navigator initialRouteName="Login">
              <Stack.Screen
                name=" "
                component={LoginScreen}
                options={{
                  headerTransparent: true,
                  headerTitle: 'Login Demo',
                  headerBackground: () => (
                    <BlurView tint="light" intensity={100} />
                  ),
                }}
              />
              <Stack.Screen
                name="Home"
                component={UserScreen}
                options={{
                  title: 'Golf-Austin',
                  headerTransparent: true,
                  headerTitleAlign: 'center',
                }}
              />
            </Stack.Navigator>
          </NavigationContainer>
        </SafeAreaProvider>
      </ApolloProvider>
    )
  }
}
And update the imported packages to reflect the <NavigationContainer>.
import {
  ApolloClient,
  ApolloProvider,
  createHttpLink,
  InMemoryCache,
} from '@apollo/client'
import { BlurView } from 'expo-blur'
import React from 'react'
import { SafeAreaProvider } from 'react-native-safe-area-context'
import useCachedResources from './hooks/useCachedResources'
import { createStackNavigator } from '@react-navigation/stack'
import { NavigationContainer } from '@react-navigation/native'

// The next steps will create these screens
import LoginScreen from './screens/LoginScreen'
import UserScreen from './screens/UserScreen'

const Stack = createStackNavigator()
Moving on to the individual screens of our app, let's rename TabOneScreen.tsx to LoginScreen.tsx and add the following imports in the file.
import React, { useState } from 'react'
import { StyleSheet, View, Button, ImageBackground, Image } from 'react-native'
import * as Google from 'expo-google-app-auth'
import { useMutation } from '@apollo/client'
import { CREATE_USER } from '../mutations/create-user'
Everything being imported is a dependency package except for CREATE_USER, which is the FaunaDB mutation that will create our user. Let's go create that mutation file and add the following mutation.
In the root of your project
mkdir mutations
Create file create-user.tsx
import { gql } from 'graphql-tag'

export const CREATE_USER = gql`
  mutation CreateUser(
    $name: String!
    $photoUrl: String!
    $email: String!
    $familyName: String!
    $givenName: String!
    $id: String!
  ) {
    createUser(
      data: {
        name: $name
        photoUrl: $photoUrl
        email: $email
        familyName: $familyName
        givenName: $givenName
        id: $id
      }
    ) {
      email
      givenName
      familyName
      name
      photoUrl
    }
  }
`
The mutation is ready to be used in the log in process. Referring back to the client IDs created earlier in Google Cloud, we can write out our LoginScreen as below. Add your keys in the Google.logInAsync.
const LoginScreen = ({ navigation }: any) => {
  const [createUser, { data }] = useMutation(CREATE_USER)

  const [user, setUser] = useState(null)
  const [accessToken, setAccessToken] = useState()
  const signInAsync = async () => {
    try {
      const { type, accessToken, user }: any = await Google.logInAsync({
        iosClientId: `{{ add key }}`,
        androidClientId: `{{ add key }}`,
      })

      if (type === 'success') {
        setUser(user)
        setAccessToken(accessToken)
        createUser({
          variables: {
            name: user.name,
            email: user.email,
            familyName: user.familyName,
            givenName: user.givenName,
            id: user.id,
            photoUrl: user.photoUrl,
          },
        })
        navigation.navigate('Home', { user })
      }
    } catch (error) {
      console.log('LoginScreen.js 19 | error with login', error)
    }
  }

  const goBack = () => {
    navigation.navigate('Home', { user })
  }

  const image = {
    uri: 'https://images.unsplash.com/photo-1587174486073-ae5e5cff23aa?ixid=MnwxMjA3fDB8MHxwaG90by1wYWdlfHx8fGVufDB8fHx8&ixlib=rb-1.2.1&auto=format&fit=crop&w=750&q=80',
  }

  return (
    <>
      <ImageBackground source={image} style={styles.image} blurRadius={0.3}>
        <View style={styles.buttonContainer}>
          <Image
            style={styles.tinyLogo}
            source={{
              uri: 'https://upload.wikimedia.org/wikipedia/commons/thumb/5/53/Google_%22G%22_Logo.svg/120px-Google_%22G%22_Logo.svg.png',
            }}
          />
          {!user && <Button title="Login with Google" onPress={signInAsync} />}
          {user && <Button title="Go Back" onPress={goBack} />}
        </View>
      </ImageBackground>
    </>
  )
}

export default LoginScreen
Then add some styling at the end of the file.
const styles = StyleSheet.create({
  buttonContainer: {
    flex: 1,
    alignItems: 'center',
    padding: 60,
    backgroundColor: 'rgba(100,200,100,0.2)',
  },
  image: {
    flex: 1,
    resizeMode: 'cover',
    justifyContent: 'center',
  },
  tinyLogo: {
    width: 50,
    height: 50,
    marginBottom: 20,
    marginTop: 50,
  },
  profilePic: {
    flex: 0,
    width: 90,
    height: 90,
    // marginTop: 0,
    borderRadius: 250,
  },
})
Let's break it down what's happening in this function and then run the Expo app.
OnPress of the Login Button, <Button title="Login with Google" onPress={signInAsync} />, The signInAsync takes the client ID from your Google Cloud account and returns a user that we assign to the state, setUser(user) and the same goes for assigning the accessToken.
The StepZen mutation with FaunaDB occurs when we assign all the variables of user to createUser, the mutation that is written in our import folder, import { CREATE_USER } from "../mutations/create-user".
const [createUser, { data }] = useMutation(CREATE_USER)

const [user, setUser] = useState(null)
const [accessToken, setAccessToken] = useState()

const signInAsync = async () => {
  try {
    const { type, accessToken, user }: any = await Google.logInAsync({
      iosClientId: `{{ add key }}`,
      androidClientId: `{{ add key }}`,
    })

    if (type === 'success') {
      setUser(user)
      setAccessToken(accessToken)
      createUser({
        variables: {
          name: user.name,
          email: user.email,
          familyName: user.familyName,
          givenName: user.givenName,
          id: user.id,
          photoUrl: user.photoUrl,
        },
      })
      navigation.navigate('Home', { user })
    }
  } catch (error) {
    console.log('LoginScreen.js 19 | error with login', error)
  }
}
Here is an example of the fields returned from Google Sign-In that we assign as variables to the StepZen mutation, createUser.
{
  "email": "sam@stepzen.com",
  "familyName": "Hill",
  "givenName": "Samuel",
  "id": "1234",
  "name": "Samuel Hill",
  "photoUrl": "https://lh3.googleusercontent.com/a-/AOh14Gi3fCa_eM-k0vLZK5z1gChGA0RS_3C-OhyIp8ml=s96-c"
}
We still need to do is create the UserScreen.tsx so the user can see they successfully logged in. Rename the TabTwoScreen.tsx to UserScreen.tsx and copy the following code.
import React from 'react'
import { StyleSheet, Text, View, ImageBackground, Image } from 'react-native'

const UserScreen = ({ route }: any) => {
  const { user } = route.params

  const backgroundImage = {
    uri: 'https://images.unsplash.com/photo-1595841055318-943e15fbbe80?ixid=MnwxMjA3fDB8MHxzZWFyY2h8MTgzfHxnb2xmfGVufDB8fDB8fA%3D%3D&ixlib=rb-1.2.1&auto=format&fit=crop&w=400&q=60',
  }

  return (
    <>
      <ImageBackground source={backgroundImage} style={styles.image}>
        <View style={styles.container}>
          <View>
            <Image
              style={styles.profilePic}
              source={{
                uri: `${user.photoUrl}`,
              }}
            />
          </View>
          <Text style={styles.banner}>Welcome {user.name}</Text>
        </View>
      </ImageBackground>
    </>
  )
}

export default UserScreen
Let's add some styling at the end of the file.
const styles = StyleSheet.create({
  container: {
    flex: 1,
    flexDirection: 'column',
    justifyContent: 'space-between',
    alignItems: 'center',
    textAlign: 'center',
    height: '100%',
  },
  image: {
    flex: 1,
    resizeMode: 'contain',
    justifyContent: 'center',
  },
  profilePic: {
    flex: 0,
    width: 90,
    height: 90,
    marginTop: 80,
    borderRadius: 250,
  },
  banner: {
    flex: 1,
    fontSize: 38,
  },
})
Heading back over to our LoginScreen, we can now see two functions that we put in earlier should work to perfection when we have a successful login.
This navigate function will redirect the user on successful login.
const signInAsync = async () => {
  try {
    if (type === "success")
      navigation.navigate("Home", { user });
  }
};
The goBack function runs when pressing the <Button title="Go Back" onPress={goBack} button on the Login page.
const goBack = () => {
  navigation.navigate('Home', { user })
}
Run the App
Now with a fully created App.tsx with our StepZen endpoint and apikey, a LoginScreen with our Google client IDs, and a UserScreen for successful logins, we can run the app!
In your terminal, run the following command.
expo start
Download the expo app on your phone, and scan the QR code provided at http://localhost:19002/ on your computer.
Select the "Login with Google" button on the app, and when prompted, login with your Google credentials. On login, you should be redirected to the UserScreen, and the FaunaDB User Collection should be updated with the user details!
Here is an example of a user added to FaunaDB.
{
  "ref": Ref(Collection("User"), "306547471891300420"),
  "ts": 1628605300720000,
  "data": {
    "familyName": "Hill",
    "name": "Sam Hill",
    "givenName": "Sam",
    "photoUrl": "https://lh3.googleusercontent.com/a-/AOh14Gi3fCa_eM-k0vLZK5z1gChGA0RS_3C-OhyIp8ml=s96-c",
    "email": "sam@stepzen.com",
    "id": "1234"
  }
}
Now you successfully have a Google sign-in with a database that can store all the users. This demonstrates the ease of adding a FaunaDB to your single StepZen endpoint that can be combined with any other data source. Writing the data of the user to more than one database or API can easily be added to this configuration in the StepZen schema.
Where To Go From Here
To learn more on how to use FaunaDB and mutations, check out our GraphQL mutation docs.
The StepZen docs also hold information on connecting other backends to your endpoint like REST APIs and databases like PostGresQL.
If you've got more questions, hit us up on Discord, we'd love to chat.