Refreshing OAuth 2.0 Access Tokens Using StepZen's Custom GraphQL Directive @sequence

 Samuel Hill
OAuth 2.0, commonly referred to as OAuth is an industry standard for authorizing application access to an API. Your application may want to maintain and continuously access a third-party API with OAuth authorization. But access tokens expire -- it is a security feature of the OAuth Authorization process. StepZen provides an easy solution to continuously keep these tokens up to date and secure.
In this post, we'll describe how to build out a schema with the StepZen directive @sequence that executes two "steps" in one GraphQL mutation. It first requests a refreshed access token from the HubSpot authorization server. When the access token is retrieved from the authorization server, the @sequence directive passes the access token to a POST request that then accesses the HubSpot resources server.
If you'd like to see a live-code demo video and a deeper dive into how OAuth 2.0 works, check it out on YouTube.
Getting Set Up
Let's get set up with the accounts and tools we'll need to build this project.
Setting Up StepZen
Create a StepZen account first, in order to get your API and admin keys. After you login to your account, your keys are available in your StepZen dashboard.
Next, you'll need the StepZen CLI to deploy and test your GraphQL endpoint. To install the CLI, follow the instructions in the docs.
Setting Up HubSpot OAuth
There are many APIs that require OAuth and can work with the @sequence directive. For this example, we will use HubSpot.
Following the OAuth Quickstart Guide step-by-step, we will create a hubspot developer account and an app that will access the resources of the newly created developer account.
Once the accounts are set up, the OAuth process is two-steps to retrieving the tokens needed to access the resources server. The first step is retrieving the code. This code is provided to us as a utm parameter after redirecting to the uri permitted by the app. See the example below.
https://app.hubspot.com/oauth/authorize?client_id={client_id}&redirect_uri={redirect_uri}&scope={scope}
After a successful redirect from the url above, you should see a utm parameter code. Copy that parameter and head over to terminal or an API tool such as Postman.
In Postman, we are going to make a POST to https://api.hubapi.com/oauth/v1/token with all the required parameters, client_id, client_secret, redirect_uri, grant_type and the code we just copied from the redirect. You can also do this in your terminal by running a curl command. Both methods require x-www-form-urlencoded Content-Types.
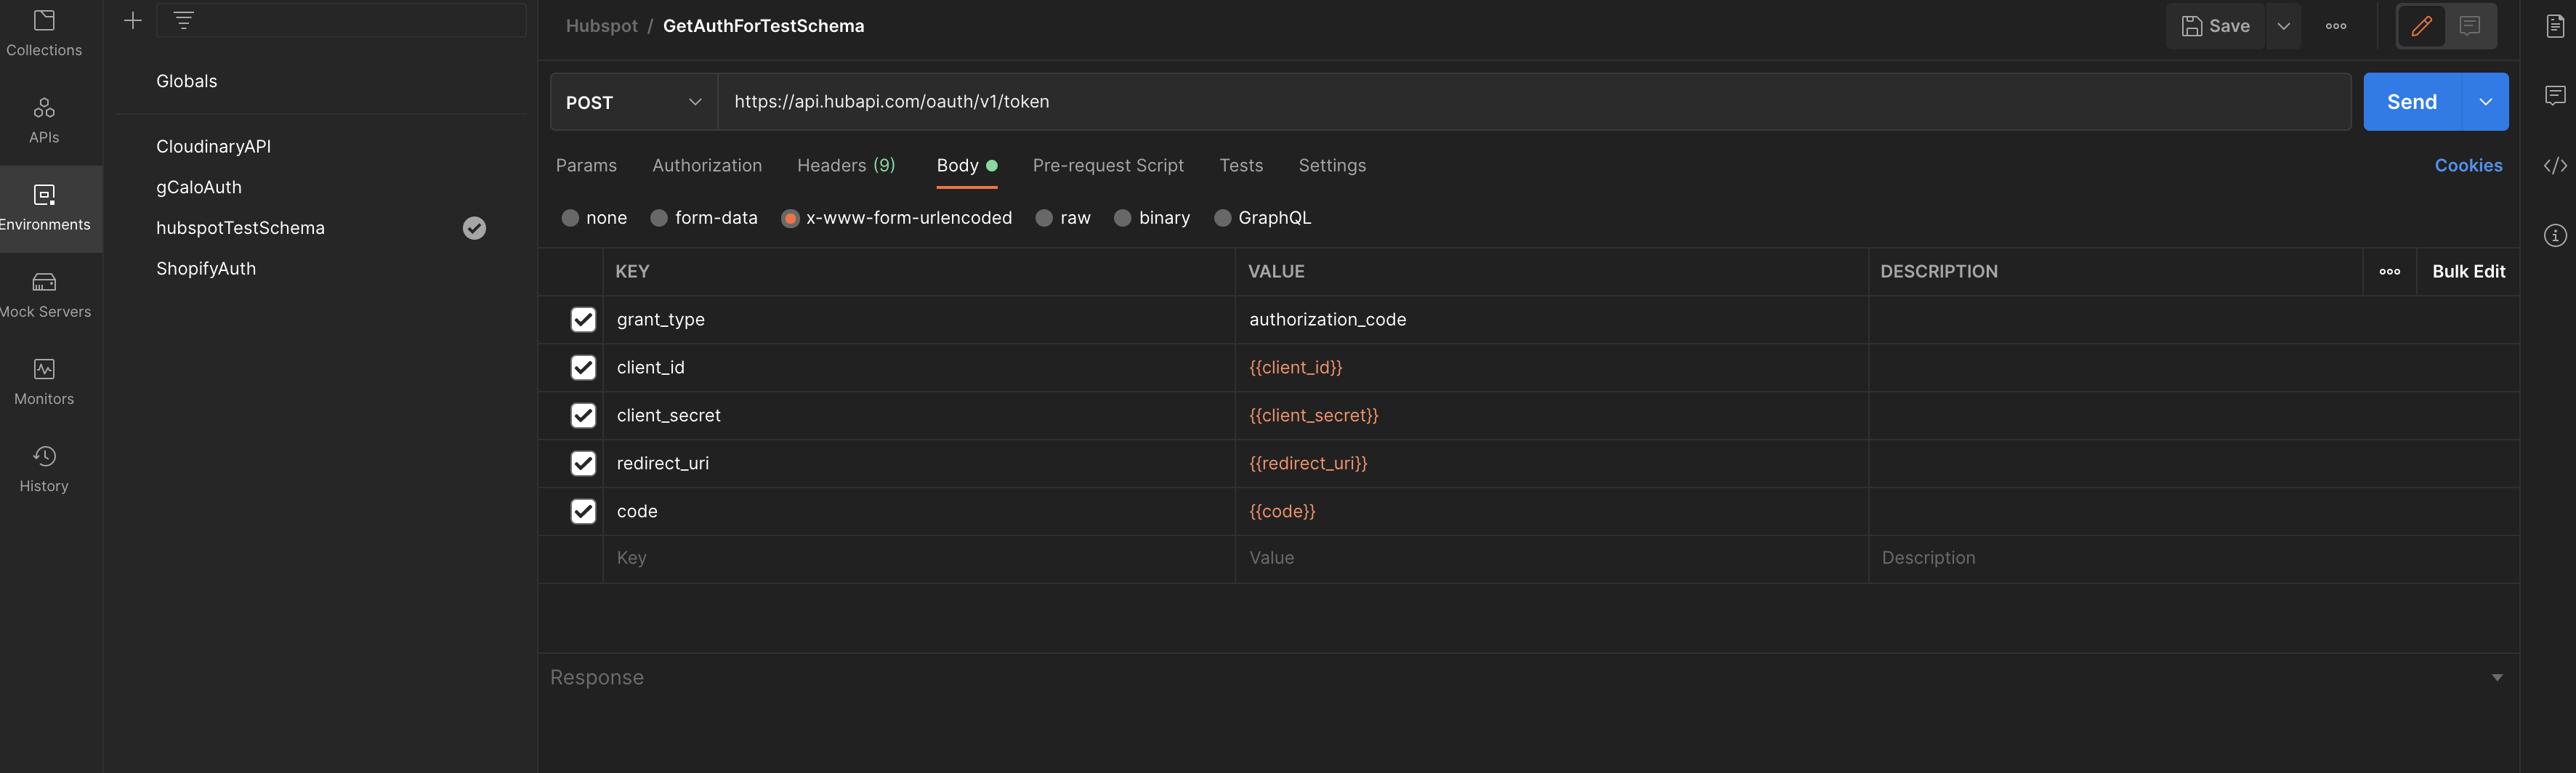
The response should provide us a refresh token and authorization token. Copy the refresh token - we will use it for our StepZen schema.
{
  "token_type": "bearer",
  "refresh_token": "12314-3ee9-4a6b-bc87-134254332",
  "access_token": "CMORsM63LxIO_4eBAEBAgAAMAEAAAAYY_MDnCSCXsaQLKM_AFzIUdnIEl9qo7Cwj2t1Z_rNAec5zYls6LgB_b8f_BwyE_wf8_-D_fc4sAAAAYAYY9DwfIBgcgA_gwx8GGQAAOIUnAADgAOBCFBZjpguluSl9IBk0ni7_U1o-pPgjSgNuYTFSAFoA",
  "expires_in": 21600
}
Building the StepZen Endpoint
First, let's make a new project folder.
mkdir stepzen-auth && cd stepzen-auth
Create a config.yaml file in the folder and add your client_id, client_secret, and refresh_token that we copied earlier.
configurationset:
  - configuration:
      name: hubspot_config
      client_id:
      client_secret:
      refresh_token:
Next, create a file named hubspot.graphql in the project and copy the code below into that file.
type Auth {
  token_type: String
  refresh_token: String
  access_token: String!
  expires_in: Float
}

type Query {
  get_auth: Auth
    @rest(
      method: POST
      contenttype: "application/x-www-form-urlencoded"
      endpoint: "https://api.hubapi.com/oauth/v1/token?grant_type=refresh_token&client_id={{.Get \"client_id\" }}&client_secret={{.Get \"client_secret\" }}&refresh_token={{.Get \"refresh_token\" }}"
      configuration: "hubspot_sequence"
    )
}
When creating an @rest directive for the get_auth query, we are adding some additional parameters to our HTTP method.
methodtells HubSpot that we are sending aPOSTrequest to create or add a resource to the resources server.contenttypetells HubSpot that we are sending ax-www-form-urlencodedContent-Type to indicate the resource media type.
If you're used to REST APIs, you might think that a POST method should be a Mutation. I did too, but in GraphQL you should think about a Mutation as something where you are mutating server side data. This is considered a gray area for APIs, but retrieving an OAuth token is more of a data retrieval case than a data modification case, so we are using a Query. The @rest directive we use does not impact how we differentiate GraphQL Queries vs Mutations.
Refer to the POST HTTP Method, StepZen Mutation Basics, and Connect a REST Service documentation for more information.
Now with the get_auth query ready for execution, add the hubspot.graphql schema to an index.graphql file.
schema @sdl(files: ["hubspot.graphql"]) {
  query: Query
}
Our final StepZen folder should have the file structure below.
.
├── index.graphql
├── hubspot.graphql
└── config.yaml
Using the StepZen CLI, run the following command.
stepzen start --dashboard=local
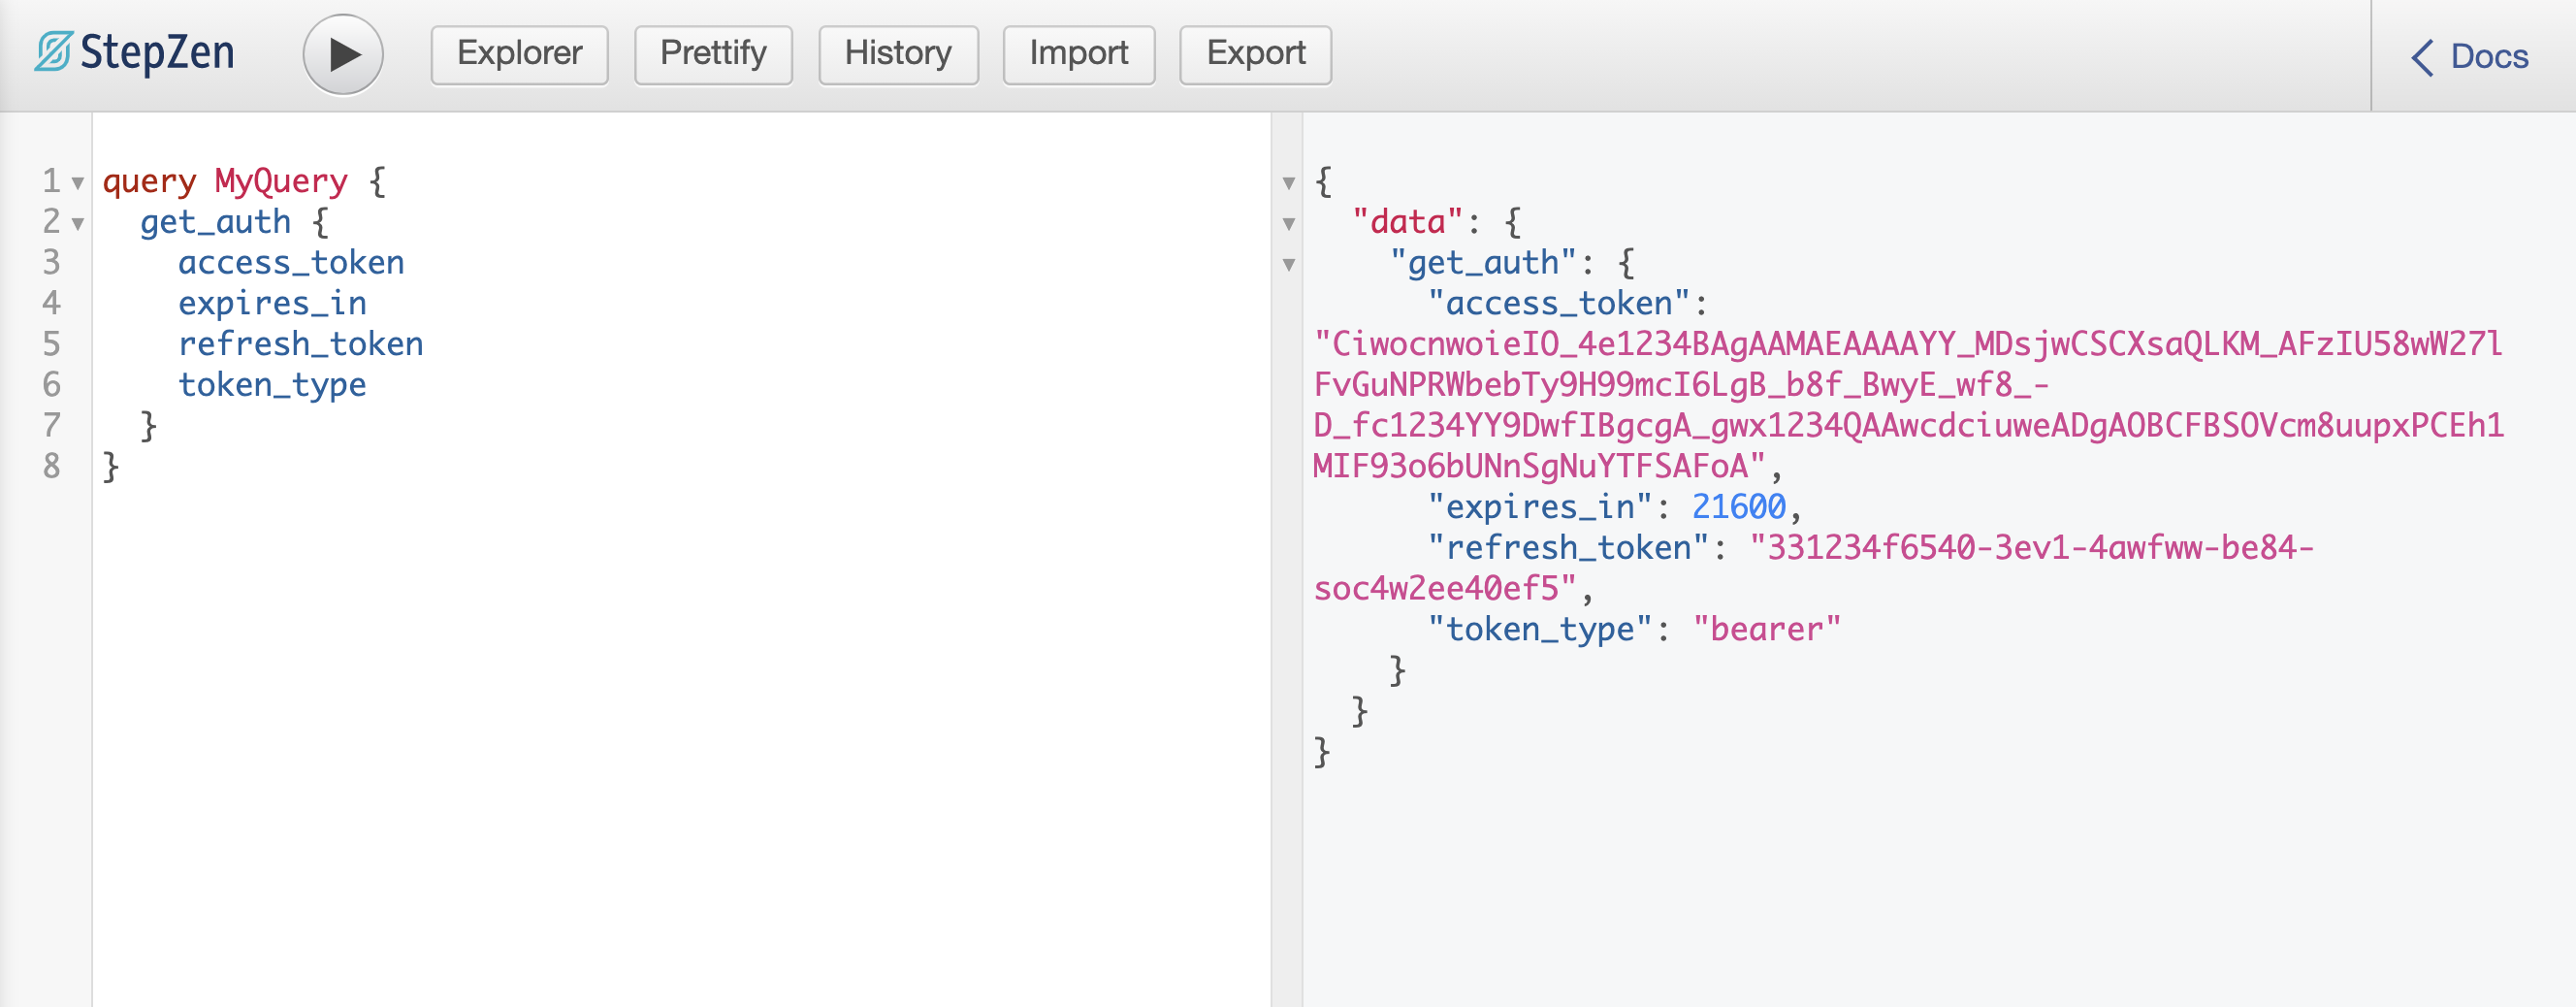
A successful stepzen start creates a GraphiQL at localhost:5001, where we can now run the get_auth query that returns the identical authorization response we saw earlier in postman.
The default way to test your GraphQL endpoint is from the StepZen dashboard explorer. You can get a local GraphiQL IDE by running
stepzen startwith the--dashboard=localflag.
Creating a HubSpot Company with the @sequence Directive
In the hubspot.graphql schema let's add a mutation, hubspot_create_company.
"""
The properties, associations, and modifications of a company.
"""
type HubSpot_Company {
  additionalDomains: JSON
  companyId: Int
  isDeleted: Boolean
  mergeAudits: JSON
  portalId: Int
  domain: String!
  name: String!
  description: String!
  stateChanges: JSON
}

type Mutation {
  """
  Create a Company
  This endpoint creates a single company defined by properties.

  Equivalent To POST /companies/v2/companies
  """
  hubspot_create_company(
    """
    Authorization Token
    """
    access_token: String!
    """
    Naming the company that is being created.
    """
    name: String!
    """
    Describing the company that is being created.
    """
    description: String!
    """
    The domain of the company that is being created.
    """
    domain: String!
  ): HubSpot_Company
    @rest(
      method: POST
      setters: [
        { field: "name", path: "properties.name.value" }
        { field: "description", path: "properties.description.value" }
        { field: "domain", path: "properties.domain.value" }
      ]
      postbody: "{\"properties\": [{\"name\": \"name\",\"value\": \"{{.Get \"name\" }}\"},{\"name\": \"description\",\"value\": \"{{.Get \"description\" }}\"},{\"name\": \"domain\",\"value\": \"{{.Get \"domain\" }}\"}]}"
      endpoint: "https://api.hubapi.com/companies/v2/companies"
      headers: [{ name: "Authorization", value: "Bearer $access_token" }]
    )
}
Similar to the HTTP Method of get_auth, we are declaring the postbody, except this time we are adding the values of name, description, and domain from the mutation arguments rather than the configuration: "hubspot_config" that we get from the config.yaml.
The other value we add is the headers directly in our schema. The $access_token variable is the final argument that is going to be pulled in using the @sequence directive with get_auth.
Sequencing the HubSpot Mutations with the @sequence Directive
Let's create an @sequence mutation, create_company_with_token in our type Mutation.
"""
Returns a newly created company via a sequence that
generates a new token and then queries the data
with the new $access_token provided
"""
create_company_with_token(
    name: String!
    description: String!
    domain: String!
): HubSpot_Company
    @sequence(
        steps: [
            { query: "get_auth" }
            {
                mutation: "hubspot_create_company"
                arguments: [
                    { name: "name", argument: "name" }
                    { name: "description", argument: "description" }
                    { name: "domain", argument: "domain" }
                ]
            }
        ]
    )
The create_company_with_token contains all the same arguments as the hubspot_create_company so that when we run the mutation, we can declare all of those variables.
The first step of @sequence executes the get_auth query and returns the type Auth fields, and most importantly, the access_token.
The second step takes the access_token and adds it as an argument to hubspot_create_company. The argument replaces the variable $access_token in the headers with the newly generated token! The arguments name, description, and domain are carried to the second step by matching it with the arguments in the @sequence, create_company_with_token.
arguments: [
    { name: "name", argument: "name" }
    { name: "description", argument: "description" }
    { name: "domain", argument: "domain" }
]
Now when we run stepzen start and execute the following mutation in the GraphiQL editor, we should see the newly created company generated in HubSpot.
mutation MyMutation {
  create_company_with_token(
    description: "the description of new company"
    domain: "example.com"
    name: "Example Company"
  ) {
    portalId
    name
    isDeleted
    domain
    description
    companyId
  }
}
The response to the mutation is
{
  "data": {
    "create_company_with_token": {
      "companyId": -1791439834,
      "description": "the description of new company",
      "domain": "example.com",
      "isDeleted": false,
      "name": "Example Company",
      "portalId": 20570236
    }
  }
}
The OAuth @sequence is complete! Now whenever the create_company_with_token mutation is executed at the StepZen endpoint, a newly generated OAuth token is passed to the hubspot_create_contact and never expires!
The @sequence directive enables continous regeneration of OAuth accessibility, a step-by-step execution of HTTP methods, and a seamless passing of variables from one executed method to another. All done from a single StepZen endpoint!
Adding the Search Mutation
That was fun, right. Want to do some more? Also with the @sequence directive, we can add a search mutation that can check to see if there are multiple companies created under the same domain.
To do so, let's create a hubspot_search_companies_by_domain mutation that searches for companies in a HubSpot account.
"""
Search for a list of companies by domain
This endpoint searches the company in HubSpot by the domain property.

Equivalent To POST /companies/v2/domains/$domain/companies
"""
hubspot_search_companies_by_domain(
    """
    Authorization Token
    """
    access_token: String!
    """
    Requesting a list of companies by searching in domain.name format
    """
    domain: String!
): [HubSpot_Company]
    @rest(
    method: POST
    resultroot: "results[]"
    setters: [
        { field: "name", path: "properties.name.value" }
        { field: "description", path: "properties.description.value" }
        { field: "domain", path: "properties.domain.value" }
    ]
    postbody: "{\"requestOptions\": {\"properties\": [\"domain\",\"createdate\",\"name\",\"description\"]},\"offset\": {\"isPrimary\": true,\"companyId\": 0}}"
    endpoint: "https://api.hubapi.com/companies/v2/domains/$domain/companies"
    headers: [{ name: "Authorization", value: "Bearer $access_token" }]
    )
This endpoint uses the same access_token as hubspot_create_contact in the @sequence. It also uses the domain field generated by the hubspot_create_contact to search for all companies registered under that domain.
With the mutation added, we can now create a new @sequence directive that takes on three steps.
"""
Returns a list of companies by domain via a sequence that
generates a new token and then queries the data
with the new $access_token provided
"""
search_companies_with_oauth(
    name: String!
    description: String!
    domain: String!
): [HubSpot_Company]
    @sequence(
        steps: [
            { query: "get_auth" }
            {
                mutation: "hubspot_create_company"
                arguments: [
                    { name: "name", argument: "name" }
                    { name: "description", argument: "description" }
                    { name: "domain", argument: "domain" }
                ]
            }
            {
                mutation: "hubspot_search_companies_by_domain"
            }
        ]
    )
Executing the new mutation with the same variables creates a new company and returns a list of companies registered under the specified domain.
mutation MyMutation {
  search_companies_with_oauth(
    description: "the description of new company"
    domain: "example.com"
    name: "Example Company"
  ) {
    companyId
    isDeleted
    portalId
    domain
    name
    description
  }
}
The results from the three step mutation.
{
  "data": {
    "search_companies_with_oauth": [
      {
        "companyId": -1791473747,
        "description": "the description of new company",
        "domain": "example.com",
        "isDeleted": false,
        "name": "Example Company",
        "portalId": 20570236
      },
      {
        "companyId": -1791439834,
        "description": "the description of new company",
        "domain": "example.com",
        "isDeleted": false,
        "name": "Example Company",
        "portalId": 20570236
      }
    ]
  }
}
Amazing! Now a list is returned of all the newly created companies that we added to our HubSpot account. The three step @sequence mutation was able to carry the access_token and company domain to the search functionality.
Where To Go From Here
To learn more on how to use @sequence, check out our docs. Check out the docs on connecting other backends to your endpoint - GraphQL and databases.
If you've got more questions or just want to hang out, hit us up on Discord, we'd love to chat.